Saturday 11 December 2021

O' Christmas Tree!

  Hello!

This week I have created another Christmas card to add to my collection...

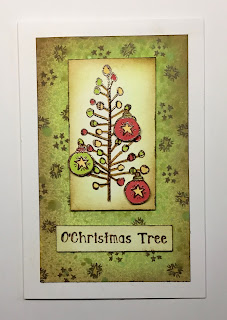
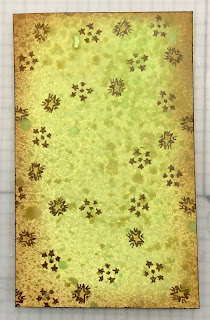
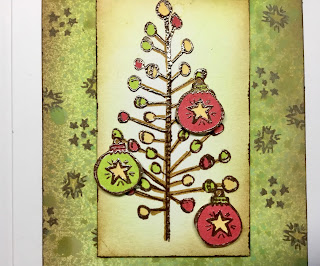
1) First I used the Twisted Citron and Crushed Olive distress oxide sprays on a piece of card...


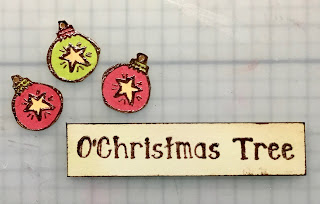
2) Next I stamped the small stars from the Doodle Art Baubles set in brown ink, coloured the stars in yellow then added some Twisted Citron and Vintage Photo distress ink around the edges...


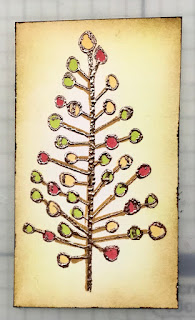
3) Having cut another smaller piece of card I stamped the Christmas tree and coloured in the circles before adding the same distress inks to the edges...


4) For the finishing elements I stamped out one of the baubles three times, cut them out and coloured them to match the tree.  Finally I stamped out one of the sentiments and edged the same as the other piece before adding them to the card...


Here are the products used:


Thank you for looking and happy crafting!
Jane xx


Saturday 4 December 2021

Just Be You!

  Hello!

This week I have created a really quick and easy card using background stamps...


1) I cut a piece of watercolour card 4 1/2" square and spritzed it with water before adding Pretty Gets Gritty sprays (Coastal Waters, Emerald Haze, Vintage Violet, Blushed Dreams).

2) Using the Art Journal Elements 2 stamps with the distress archival inks I stamped the background.

3) I then stamped a sentiment from Handwritten Words 1 in black archival and layered the card onto black.

Here are the products used:

* PGG Amazing Sprays - https://www.beecrafty.net/pretty-gets-gritty.irc?pg=1

* Art Journal Elements 2 - https://www.beecrafty.net/art-stamps-journal-art-elements-2.ir

* Handwritten Words 1 - https://www.beecrafty.net/wordage-sets-handwritten-words-1.ir

* Archival Ink pads - https://www.beecrafty.net/archival-ink-hero-arts.irc

Thank you for looking and happy crafting!

Jane xx

Saturday 27 November 2021

A Nutcrackin' Christmas Card

  Hello!

This week I have made a fairly quick and easy card using up a background created by mopping up some ink!...

1) The background had been created by printing off the distress oxide spray from the snowflake inkable.

2) I stamped out the nutcracker and the baubles onto watercolour card using archival ink.

3) The images were cut out then coloured using ecoline markers.

4) I stamped the lights across the top of the card, lining them up to get a continuous string, then coloured them with the ecoline markers too.

5) The baubles and nutcracker were glued onto the card, then I used a fine liner pen to draw in the strings and a shadow under the nutcracker.

6) I stamped out the sentiments and edged the piece of card with black ink before attaching to the card.

7) Finally the card was matted onto black card then a 7" x 5" card blank.


Here are links to the products used:

* Nutcrackin Christmas Stamps - https://www.beecrafty.net/bee-crafty-yuletide-doodle-art-stamps-nutcrackin-christmas.ir
* Snowflake Mask - https://www.beecrafty.net/inkables-template-snowflake-mask.ir
* Ecoline Markers - https://www.beecrafty.net/ecoline-brush-pens.irc
* Distress Oxide Sprays - https://www.beecrafty.net/tim-holtz-distress-oxide-spray.irc

Thank you for looking and happy crafting!
Jane xx


Saturday 13 November 2021

'Enjoy Yourself' A Festive Card

  Hello!

This week I am using up the rest of a background created in my Facebook live over on the Bee Crafty page to complete another festive card...

1) Using the background that I had already created using distress oxide sprays, I added Prize Ribbon distress ink through a snowflake inkable...


2) To highlight the stenciling I used a white pen to add some dots and dashes around the ink...


3) Next I took the word stamp from the Snowflake Border set and stamped along each edge with the Prize Ribbon ink.  I wiped away some of the ink from one edge of the stamp to create less of a harsh edge...


4) The cone flower and present shapes were stamped, cut out and then coloured using ecoline brush markers and some highlights and glitter pen added...


5) Finally I stamped and embossed a sentiment from Everyday Sentiments 1 XL and put the card together...


These are the products used:

* Distress Oxide Sprays
* Distress Inkpads
* Snowflake Inkable
* Art Stamps - Snowflake Border
* Art Stamps by Jane Royston - Happy Day & Beautiful Life
* Wordage Stamps - Everyday Sentiments 1 XL
* White Pen
* Ecoline Brush Pens
* White Embossing Powder


Thank you for looking and happy crafting!
Jane xx


Saturday 6 November 2021

'Don't Look Backwards' Art Journal Spread

  Hello!

This week on the Bee Crafty blog I am sharing an art journal spread that I have made in the white Dina Wakley journal...


1) I started by adding some of the tea stained engineering washi tape along the centre of the pages then in places across the spread.  I used the distress collage medium to make sure it stayed stuck down.  Once it was dry I added a layer of clear gesso...


2) Next I added distress oxide sprays, making sure to dry between each colour.  I used Rusty Hinge, Vintage Photo and Crushed Olive...


3) As there was a layer of gesso under the sprays I was then able to lift some of the ink back off to create a lighter look.  I also placed the Metal Alpha stencil onto each page and sprayed through with water to get a faint ghosted effect...


4) To create some extra light areas I used the same stencil with white gesso through it...


5) Next I used the archival distress inks in Vintage Photo, Ground Espresso, Hickory Smoke and Peeled paint with the Ledger and Film Strip stamp sets to add interest to the background...


6) After that I stamped out some of the elements from the same stamp sets plus a sentiment from Ticker Tape 2 in ground Espresso then blended on some Vintage Photo distress ink...


7) Finally I used glue gel to attach the elements to the spread with some black thread added beneath to help break up the elements from the background...


Here are links to the products used...


Thank you for looking and happy crafting!
Jane xx


Saturday 30 October 2021

'Explore and Discover' A Lunar Themed Card

  Hello!

This week on the Bee Crafty Facebook page I did a Facebook live experimenting with some colour combinations to go with the new distress colour Villainous Potion.  As part of the live I created an ATC that had a space theme so I decided to use that as a topper for a bigger card...

1) I cut a piece of mixed media card and used Villainous Potion and Peacock Feathers distress inks with a blending brush.  To create a more distressed look I splashed droplets of water across the card and lifted some of the ink with a piece of kitchen towel...

2) Next I stamped the largest star from the Star Textures set using Prize Ribbon distress ink...


3) Taking one of the smaller stars from the set I stamped using the Villainous Potion distress ink...


4) Making sure the ink layers were dry I then stamped the star cluster using embossing ink and heat embossed using superfine gold embossing powder...


5) I stamped out the largest star again onto black card with the same ink and embossing powder to use alongside the ATC for the card toppers...


6) Finally I put the card together, using some black thread under the stars for extra texture and dimension...


Here are links to the products used:


Thank you for looking and happy crafting!
Jane xx


Saturday 23 October 2021

Hello Dream Girl Card

  Hello!

This week on the Bee Crafty Facebook page there was a brand new stamp launch!!!  The bundle prices will stay in place until the end of the month and can be found on the website in the October Launch section.

If you didn't see it, all the live demos will remain on the page and our lovely Ann also made a fab video which is on the Bee Crafty YouTube channel!

So this week for my blog post I have created a card using 2 of the new sets but added a different sentiment...


I didn't take step by step photos as it was a fairly straight forward card to make but this is what I did..


1) On a piece of watercolour cardstock I stamped the Dream image using black archival ink.

2) Then I coloured the image using Ecoline brush pens and matted onto black cardstock.

3) On a bigger piece of cardstock I stamped some of the Journal Elements #2 mostly in two of the corners and mounted the image on top with foam tape.

4) Finally I stamped one of the Everyday Sentiments onto black card with clear embossing ink and heat embossed with white embossing powder.


Here are links to the products used:

* Art Stamps - Art Journal Elements 2

Wordage - Everyday Sentiments 1

Ecoline Brush Pens

Ranger Superfine Embossing Powder - White

Thank you for looking and happy crafting!

Jane xx


Saturday 16 October 2021

Funky Card!

  Hello!

I have created a funky card for the blog this week that could be used for a number of occasions...


1) I started by layering up some distress inks one at a time and drying between each layer.  The colours were Carved Pumpkin, Wilted Violet and Twisted Citron, once the colours were smooshed on I also added a few orange splatters...

2) Using the same colours I then added some stamping with the Arrows set...


3) Next I stamped one of the borders from the Borders #1 set and added the smallest circle from the Journal Blocks with black archival ink...


5) Then the circles were coloured in with the distress inks and once dry white pen was added...


6) Finally a sentiment from Everyday Sentiments 1 was stamped out and mounted onto black card...


Here are links to the products used:


Thank you for looking and happy crafting!
Jane xx


Saturday 9 October 2021

Vintage Dragonfly Art

  Hello!

Following on from a Facebook live that I did this week using some of the collage stamps, I decided to make a card using the Dragonfly Art stamp...


1) I started by blending some Tea Dye and Antique Linen distress ink over a piece of card...


2) Using Rusty Hinge distress ink I added some stenciling through the Damask inkable...


3) Next I added Gathered Twigs distress ink through the Medieval Trellis inkable...


4) To break up some of the darker areas I then splattered Salvaged Patina and Antique Linen distress oxide sprays across the card...


5) After making sure the ink was dry and using an anti static bag, I stamped the Dragonfly Art stamp using clear embossing ink then heated it with gold embossing powder.  I re stamped the dragonfly onto card in the same way then cut it out and layered it onto the main stamped image...


6) Finally I stamped a sentiment from Small Words onto metallic card and embossed again with gold and then matted and layered the whole card...


Here are links to the products used:


Thank you for looking and happy crafting!
Jane xx