Hello!
This week on the Buzzy Goings on at Bee Crafty blog I am sharing another tag where I used up some of the alcohol ink pieces that I used on my previous tag which you can read about here...
http://beecraftybidford.blogspot.com/2019/06/jane-dt-sunny-sunflower-tag.html
I had lots of small pieces of the background left so decided to use it for a collage to make the base on this journaling tag...
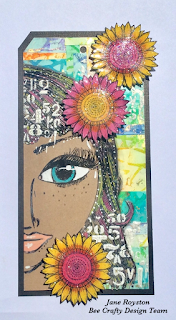
Once I had added all the small pieces to the background I stamped the large girl face onto acetate and coloured parts using paint pens before attaching to kraft card...
I also had some flowers already stamped and cut out from the other tag so coloured them with pens before adding glossy accents and some fine glitter.
There needed to be a bit of something else so I used crackle paste through the metal alpha d'inkable and once that had dried added the flowers and mounted the tag onto black card...
On this occasion I decided not to add a sentiment or phrase as I think this tag may become part of a larger project or be placed in an art journal spread.
Here are the products I used:
* Art Stamps - Doodle Art Girl XL
* Art Stamps - Doodle Sunflower Regular
* D'Inkables - Metal Alpha
* Dylusions Journaling Tag #10
* Alcohol Ink
Thank you for looking and happy crafting!
Jane xx
A craft blog with tutorials for a range of papercraft, mixed media and altered art projects
Saturday 29 June 2019
Sunday 23 June 2019
Wandering Heart Tag for Tando Creative
Hello!
This week the theme on the Tando Creative blog is 'Anything Goes' so I couldn't resist decorating another of the tags for my technique binder, although I am using mine for journaling tags. I also wanted to use some of the fabulous steampunk parts that Di recently brought to HOCHANDA and mixed it up with some other bits and bobs from my Tando crafty stash...
This week the theme on the Tando Creative blog is 'Anything Goes' so I couldn't resist decorating another of the tags for my technique binder, although I am using mine for journaling tags. I also wanted to use some of the fabulous steampunk parts that Di recently brought to HOCHANDA and mixed it up with some other bits and bobs from my Tando crafty stash...
To start I got out lots of my greyboard pieces and decided which I would like to use. I quickly chose the cog piece with the smaller cogs inside to be the main focal element before choosing some extra cogs from the minis and some wings and a heart.
These pieces were primed with white gesso then I used pigment powders, acrylic paint and embossing powder to colour them until I was happy. As I wanted the heart to stand out I used red paint then coated it with glossy accents, putting in a small gem whilst the glaze was still wet...
As the main elements were quite 'busy' I wanted the background of the tag to be reasonably plain, so I painted the tag with black gesso then used parts of the XL script stamp by Bee Crafty with some detail gold embossing powder...
When the tag had been put together I felt like it had a celestial look to it, so chose a sentiment from the Tim Holtz small talk stickers that went with the theme and added some white pen to the words and some little stars to the background, I also added a few clear gems just to finish it off.
Here are the products I used:
Thank you for looking and happy crafting!
Jane xx
Saturday 22 June 2019
Prehistoric HOCHANDA Samples for Bee Crafty
Hello!
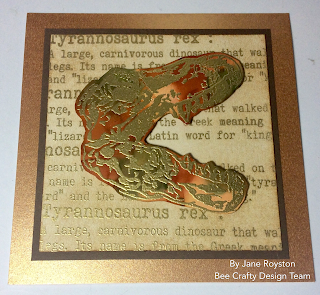
Today on the Buzzy Goings on at Bee Crafty blog I am sharing with you the samples I made using the new dinosaur stamps that were on HOCHANDA this week...
If you missed any of the demonstrations they will still be available on the HOCHANDA website on Rewind.
Thanks for looking and happy crafting!
Jane xx
Today on the Buzzy Goings on at Bee Crafty blog I am sharing with you the samples I made using the new dinosaur stamps that were on HOCHANDA this week...
Thanks for looking and happy crafting!
Jane xx
Friday 21 June 2019
Butterfly Moments with Hunkydory
Hello!
A few weeks ago I was surprised and excited to receive an e mail form HunkyDory crafts asking if I would like to review some of their products on my blog so of course I said yes!!
Full disclosure - I was able to choose some products to be sent to me to use and give my honest opinion about. Although these products were received for free I will only ever give my honest opinion and I am only going to comment on the products I used, I will not be comparing them to any other similar products available.
The first project I made was an art journal spread as I wanted to try out the prism powders in different ways. I made a video of the process and you can watch that by clicking on this link:
https://youtu.be/G_yYYDTCSM0
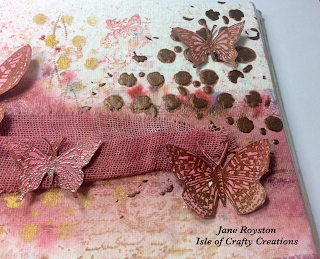
The stamp sets I chose were 'Tattered Trims' and 'Butterfly Wishes'. These are clear stamps that stick straight to an acrylic block or stamping platform and are really good for easy positioning. They stamp really crisply for an excellent impression. Within my journal I used the 'Tattered Trims' as background stamps for added texture and interest, they work well as whole stamps, or you can stamp with just parts for a more distressed look. The butterfly set has a variety of sizes and style of butterflies as well as some lovely sentiments that could be used for many occasions. The butterflies are also not too fussy for cutting out which was what I did with them for my spread...
The stencil I chose is a lovely generic pattern that is suitable for many different types of projects. In the journal I used it with texture paste, which gave a nice deep layer and then with paint, but it could also be used for spritzing, inks or many other mediums as it cleaned up easily.
The Prism powders that I chose were set 3 and contain the colours: Sepia Splendour; Brilliant Burgundy; Radiant Rose. The colours are beautiful and these powders go such a long way! They are able to be used in many different ways. In my journal I sprinkled and spritzed which gave me an array of different colours within the one powder and once they started to dry you could really see the pearlescent colour on the page . I mixed some with clear texture paste to create a more solid colour. By mixing them with water I was able to create a watercolour paint and also used them to colour some fabric...
As the stamps had mostly been used for the background in the journal I wanted to try them out with black ink to see how well they stamped so also made a card and an ATCoin...
With these projects I wanted to show the depth and crispness of the stamping impression so stamped into embossing powder which I had coloured with the prism powders...
The black ink for the sentiment also shows how they create a really clear impression.
I stamped the butterfly twice to layer it up for a more 3D look, but these stamps could be used in so many ways.
Although I have created a very vintage feel with my projects these would equally suit fresh, bright colours... which I may try for another blog post!
Overall I really loved the style of the design of the stamps and stencil and the quality was excellent. I enjoyed playing with the prism powders and am looking forward to finding even more ways to use them.
HunkyDory have a wide range of stamps and stencils amongst other products on their website https://www.hunkydorycrafts.co.uk
Here are the products that I used...

 I have really enjoyed using these products in my projects and will definitely be creating more with them soon!
Thanks for looking and happy crafting,
Jane xx
A few weeks ago I was surprised and excited to receive an e mail form HunkyDory crafts asking if I would like to review some of their products on my blog so of course I said yes!!
Full disclosure - I was able to choose some products to be sent to me to use and give my honest opinion about. Although these products were received for free I will only ever give my honest opinion and I am only going to comment on the products I used, I will not be comparing them to any other similar products available.
The first project I made was an art journal spread as I wanted to try out the prism powders in different ways. I made a video of the process and you can watch that by clicking on this link:
https://youtu.be/G_yYYDTCSM0
The stamp sets I chose were 'Tattered Trims' and 'Butterfly Wishes'. These are clear stamps that stick straight to an acrylic block or stamping platform and are really good for easy positioning. They stamp really crisply for an excellent impression. Within my journal I used the 'Tattered Trims' as background stamps for added texture and interest, they work well as whole stamps, or you can stamp with just parts for a more distressed look. The butterfly set has a variety of sizes and style of butterflies as well as some lovely sentiments that could be used for many occasions. The butterflies are also not too fussy for cutting out which was what I did with them for my spread...
The stencil I chose is a lovely generic pattern that is suitable for many different types of projects. In the journal I used it with texture paste, which gave a nice deep layer and then with paint, but it could also be used for spritzing, inks or many other mediums as it cleaned up easily.
The Prism powders that I chose were set 3 and contain the colours: Sepia Splendour; Brilliant Burgundy; Radiant Rose. The colours are beautiful and these powders go such a long way! They are able to be used in many different ways. In my journal I sprinkled and spritzed which gave me an array of different colours within the one powder and once they started to dry you could really see the pearlescent colour on the page . I mixed some with clear texture paste to create a more solid colour. By mixing them with water I was able to create a watercolour paint and also used them to colour some fabric...
As the stamps had mostly been used for the background in the journal I wanted to try them out with black ink to see how well they stamped so also made a card and an ATCoin...
With these projects I wanted to show the depth and crispness of the stamping impression so stamped into embossing powder which I had coloured with the prism powders...
The black ink for the sentiment also shows how they create a really clear impression.
I stamped the butterfly twice to layer it up for a more 3D look, but these stamps could be used in so many ways.
Although I have created a very vintage feel with my projects these would equally suit fresh, bright colours... which I may try for another blog post!
Overall I really loved the style of the design of the stamps and stencil and the quality was excellent. I enjoyed playing with the prism powders and am looking forward to finding even more ways to use them.
HunkyDory have a wide range of stamps and stencils amongst other products on their website https://www.hunkydorycrafts.co.uk
Here are the products that I used...


Thanks for looking and happy crafting,
Jane xx

Saturday 15 June 2019
Sunny Sunflower Tag for Bee Crafty
Hello!
Today on the Buzzy Goings on at Bee Crafty blog I am sharing another large journaling tag!
I am really enjoying using these tags as they make a change from cards but you could use them in the same way or like I am doing add them into an art journal.
This time I have created a variety of colourful layers using different mediums...
I started by creating a background on the tag using the Mandala 5 stencil and some ink sprays...
Then the Script XL stamp was used with versamark and gold embossing powder before being mounted onto black card...
Next I used my alcohol inks to create a rainbow of colour on a piece of YUPO paper then added gold foil where the ink remained tacky...
To add extra interest and carry through some of the elements from the tag background, I used the Mandala 5 stencil again, this time putting some of the lift ink reinker onto foam to remove parts of the alcohol ink...
Then I cut the background into squares and mounted them onto black card...
The squares were adhered to the tag then I stamped out the two sizes of doodle art sunflowers, cut them out and coloured them using my Faber Castel Pitt Pens. Finally a sentiment from Ticker Tape 2 was added...
These are the products I used:
* Art Stamps - Doodle Art Sunflower Regular
* Art Stamps - Doodle Art Sunflower XL
* Backdrops - Script XL
* Wordage - Ticker Tape Sentiments 2
* Inkables - Mandala 5
* Dylusions Journaling Tags #10
* YUPO Paper
* Alcohol Inks
* Alcohol Lift Ink Reinker
I hope my bright tag has helped to brighten your day and thank you for looking.
Happy crafting!
Jane xx
Wednesday 12 June 2019
'Nature Has It' Journaling Tag for Tando Creative
Hello!
This week on the Tando Creative blog the theme is 'Nature Has It' which means that we needed to include something natural within the project.
I decided to create a tag for my technique binder that I am using for journaling and make the whole project nature inspired...
I started by creating a wood effect background using weathered wood and crackle paint tinted with burnt sienna fluid acrylic. Then I added some washes of burnt sienna and burnt umber.
To create extra interest in the background I stencilled with the Tando mini distressed diamond stencil and used a script stamp with archival ink.
My main feature was a group of flower elements from Little Birdie along with some real mini pine cones and moss. The final element was some Tim Holtz clippings which I chose and put together as my journaling...
Here are the products I used:
* Tando Creative - Technique Binder and Tags
* Tando Mini Stencil - Distressed Diamond
* Decoart Mediums
* Decoart Fluid Acrylics
Thank you for looking and happy crafting!
Jane xx
Saturday 8 June 2019
Butterfly Tag for Bee Crafty
Hello!
Today on the Buzzy Goings on at Bee Crafty blog I am sharing a project created on one of the Dylusions journaling tags (#10)...
Today on the Buzzy Goings on at Bee Crafty blog I am sharing a project created on one of the Dylusions journaling tags (#10)...
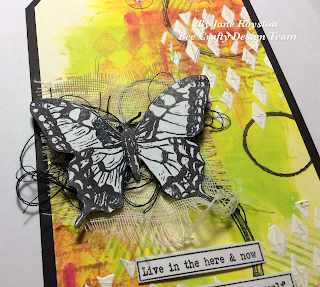
I started by adding some Dylusions paints to the tag with my fingers - Lemon Zest, Fresh Lime and Bubblegum Pink...
To create extra interest in the background I used stamps with archival inks - Distress Diamonds, Franking Marks and Script XL...
As a more dominant feature I then used the Style Wire Circle stamps with black archival ink to make them stand out...
I wanted some extra contrasting detail that would also give more texture so added crackle paste through the Distressed Harlequin D'inkable...
For the final focal points I used the Large Butterfly stamp and left it without colour. This was layered up onto some cambric and thread. Finally I added the sentiment from Ticker Tape 2 and then mounted the tag onto black...
Here are the products that I used:
Thank you for looking and happy crafting!
Jane xx
Saturday 1 June 2019
Bright Bee ATCoins for Bee Crafty
Hello!
Today on the Buzzy Goings on at Bee Crafty blog I felt like creating something bright and fun so decided to decorate some MDF Artist Trading Coins...
Artist Trading Coins are based on the same idea as trading cards just in a circle! They measure 2 and a half inches across and are ideal for when you want to create a little piece of art work.
I started by coating my coins with white gesso as I wanted to have bright colour tones...
Next acrylic paint was brayered on using orange and pink. Then yellow and green paint was stencilled through the regular dots and sunset d'inkables...
To add some focal points and contrast I used white gesso though the circles d'inkable...
For extra definition I used the Dylusions black paint pen to add doodles to the circles then stamped the lines from the Regular Dragonfly Doodle Art set with black archival ink...
The finishing touches were to stamp out the tiny bee from the Regular Bee Doodle Art set and sentiments from Ticker Tape 2...
To create this project I used:
* Art Stamps - Bee Doodle Art Regular
* Art Stamps - Dragonfly Doodle Art Regular
* Wordage - Ticket Tape 2
* D'Inkables - Regular Dots; Sunset; Circles
* Dylusions Paint Pens
* Archival Inkpads
I will add these to my growing ATC collection and hope you will have a go at making some mini art works!
Happy crafting,
Jane xx
Subscribe to:
Posts (Atom)


