Saturday 28 September 2019

'Sunflower Days' for Bee Crafty

Hello!

Today on the Buzzy Goings on at Bee Crafty blog I am sharing a sunny sunflower card...


I started by blending some distress inks onto a piece of stamping card using my blending brushes.  The colours used were Broken China, Faded Jeans, Crushed Olive and Peeled Paint.

Then I splashed on some droplets of water and after leaving for a few seconds blotted them off.

Using the Large Sunflower stamp from the Beautanicals range I stamped the sunflower onto the card 3 times with Sepia Versafine and then heat embossed with clear powder.  Next I coloured the flowers with my Pitt Pen markers...


After this I stamped out the flower and a couple of the leaves again and cut them out before colouring them in.  These pieces were then stuck over the top of some of the elements then a sentiment stamped directly onto the card...


To create this card I used:


Thank you for looking and happy crafting!

Jane xx

Monday 23 September 2019

'Floral Favourites' Cards with HunkyDory Crafts

Hello!

Following on from some of my previous blog posts I am today using some more products that I have kindly been allowed to choose to review for HunkyDory Crafts...

Full disclosure: I have been given these products to review for free and to keep, however any views I have are my own and will be totally honest.


* This time I have chosen a floral stamp set as I love flower stamps due to their versatility but also because they will fit in beautifully with the butterfly and mandala sets I have used previously.

* As I had chosen flowers I thought that I would try out a different sort of product and something that I do not use all the time but create great flower centres and that was the Diamond Sparkles Glitter Gemstones (I chose the monochrome and amber collections).

* Because I do a lot of stamping and inking I was intrigued to try the 'Ink Me' cardstock pad, as I am always looking out for great stamping card!

* Finally I chose another set of the Prism Pearlescent powders as I felt that the colours in set 2 would go well with the theme.

If you would like to see any of the other projects I have made with HunkyDory products I will link the blog posts at the end of this post.

I created 3 cards using the products and I videoed the creation of the embossed resist card which you can watch on my YouTube channel https://youtu.be/rmB426wbXLw


The cardstock is a good size at 8" x 8" as it is gives you plenty to work with but can also be easily cut down for smaller cards leaving a decent amount of excess for other things.  There are 50 sheets in the block and I like the fact that it is gummed together to help with storage. 
It is 300gsm which gives it a good sturdy weight and for my smallest card I used it as the card base. 
The card surface is really smooth and all the stamping I did onto it came out crisply.  It also made a great base for blending the prism inks onto, giving a lovely soft and smooth finish (you can see this in the video)...


The stamp set is the usual high quality that I always find with HunkyDory.  Although it is best to prime your stamps when new, I used these direct from the packet and still achieved lovely crisp and clear images.  The fact that they are clear stamps also makes them great for placement.
Floral Favourites has a variety of flower styles and sizes and they are more of a stylized than realistic look which I love!  The shapes are also not too fiddly for cutting out after stamping and could also be layered up.  I like that the set has 4 different sentiments in, including a few that could be for many occasions...


The gems come in two different sizes on the sheets and also have a variety of tones within the same set.  I chose these two sets as although I love gold and silver for their ability to go with almost anything, the amber and monochrome had a lovely mix of tones that include gold and silver but also other colours.  They have a slight facetted finish and the glitter is just right to give a bit of sparkle!


I used the Prism Powders onto watercolour cardstock from my stash as I wanted to add a lot of water and this is not what the Ink me card is for (although I will have a try in the future to see how it hold up!).  The pigment powder colours in set 2 go really well together and create some lovely blends.  As always it is fantastic to see them burst as the water is added but these are great for that extra bit of pearlescence as well.  This time I only used them in one way but in my previous posts and videos I have shown other ways in which they can be used.

The card below was created using the pieces that I cut off my first card, just adding some of the gems and a sentiment...


I really enjoyed using the products to create these cards and will be combining them with the other products I have to create some future videos.

All of the HunkyDory products can be found on their website at https://www.hunkydorycrafts.co.uk

Here are the products that I used, click on the name to link directly to them:

* For The Love of Stamps - Floral Favourites
* Diamond Sparkles Glitter Gemstones - Monochrome
* Prism Powders - Set 2
* 'Ink Me' 8" x 8" Cardstock Block
* Prism Ink Pads

Thank you for looking and down below I will link to some of the other blog posts, happy crafting!

Jane xx

https://isleofcraftycreations.blogspot.com/2019/09/mandala-canvas-with-hunkydory-crafts.html
https://isleofcraftycreations.blogspot.com/2019/06/butterfly-moments-with-hunkydory.html
https://isleofcraftycreations.blogspot.com/2019/08/butterfly-atcs-using-hunkydory-prism.html

Saturday 21 September 2019

'Snowflake Blues' For Bee Crafty

Hello!

Today on the Buzzy Goings on at Bee Crafty blog I am sharing with you a card that developed from some ink spray play...


Like most crafters there are times for me when I am not sure what I want to make and at these times I usually find that the best thing to do is something!  So when I didn't know what to do this week I decided to just grab a piece of glossy card stock and a couple of Dylusions ink sprays (bubble gum pink and calypso teal) to see what would happen.

I sprayed the inks onto the card then blotted and wiped away the excess using a piece of kitchen roll...


At first when I looked at the background I thought I would use the wildflower silhouette stamps in a dramatic black but wanted to add some texture first, so I pulled out my texture discs and chose one that appealed to me before stencilling through with white gesso...


Once I saw the effect I revised my idea and decided that this was now a wintry, snowy background and got out my Doodle Art Snowflake set.  I used some of the smaller snowflake stamps and the text (I love text stamps!!) with the Archival inkpads in distress colours...


To create some texture and add some sparkle I then used the snowflake d'inkable with silver glitter paste...


I always like to create a focal point to my projects so stamped the 2 largest snowflakes, cut them out and coloured them using Faber Castel Pitt markers.  To match the silver snowflakes I added a silver gem to the centre of the smaller one...


Finally I layered these images up and added them to the card along with a sentiment from the Everyday Christmas sentiments with a few more gems to finish the project...


To make this card I used the following products:

* Yuletide - Doodle Art Stamps Snowflake (regular)
* Yuletide - Everyday Christmas 1
* D'Inkable - Snowflakes
* Texture Discs Set 1
* Dylusions Ink Sprays
* Tim Holtz Distress Archival Inkpads

I hope you enjoyed finding out about my project and that you get time to have a play with some crafty goodies this week, happy crafting!

Jane xx

Monday 16 September 2019

'HOCHANDA Mondays' for Tando Creative

Hello!

Today on the Tando Creative blog I am sharing a couple of the projects that have been previously created for the HOCHANDA shows and I thought I would start with some rusty ones...


Large Tando hearts decorated with a selection of the cogs and butterflies.


Stencil board covers using the stencils that go in between.

The rust is created using sand texture paste from Decoart and then coloured using the Decoart Media fluid acrylics.

Thank you for looking and happy crafting!

Jane xx

Saturday 14 September 2019

'Doodle Art Mixed Media Canvas' for Bee Crafty

Hello!

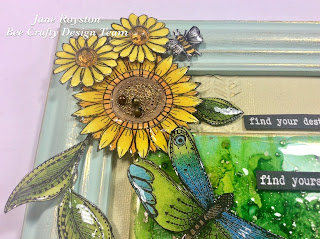
Today on the Buzzy Goings on at Bee Crafty blog I am sharing a mixed media piece that I have made using a mixture of the Doodle Art stamps, but it all started with some alcohol inks...


I love playing with my alcohol inks and recently bought a pack of white tiles from my local DIY store.  After adding some of the inks to the tile along with blending solution I decided that I wanted to add resin to the top and put in some glitters and beads...


Once it had cured I loved how it looked but wasn't sure what to do with it so I decided that I would add it to a canvas and use the doodle art stamps to create a mixed media piece.

I painted the frame which was originally a pine colour and added gilding wax.  Then I added some modelling paste through one of the texture discs to the canvas.  Once dry I painted the canvas and added gilding wax to match the frame...


After stamping and cutting out the pieces that I wanted from a variety of the sets (links can be found below) I coloured them using Pitt pens by Faber Castel and coated them with glossy accents to mirror the gloss of the resin.  To also continue the theme of the tile I added some beads to the flowers...


All the elements were added to the canvas with glue gel and then two sentiments from Small Words were heat embossed with white powder onto black card for the finishing touch.

Here are the products used:

* Art Stamps - Doodle Dragonfly #1 (regular)
* Art Stamps - Doodle Sunflower #1 (regular)
* Art Stamps - Doodle Bee #1 (regular)
* Art Stamps - Doodle Bird #1 (regular)
* Wordage - Small Words
* Inkables Texture Discs - Set 2
* Alcohol Inks
* Blending Solution

Thank you for looking and happy crafting!

Jane xx

Tuesday 10 September 2019

'Resist Butterfly Card' for Tando Creative

Hello!

I thought that I would do something a bit different this week with my project on the Tando Creative blog and make a card! 

As it is resist week I decided to use clear embossing powder for my resist on both card and a Tando whiteboard piece...


I started by using a versamark ink pad through the arrows stencil onto a piece of stamping card.  It was then coated with clear embossing powder and heated until it turned glossy. 

Once it had cooled I used distress inks with a blending brush (broken china and faded jeans) then wiped the ink off of the embossing...


I used the same technique through the dots stencil onto one of the whiteboard butterflies from Tando and then used wild honey and mustard seed inks on top.  I also added a little bit of black around the edges for extra definition.

To finish the card I added a strip of white vellum, some black gems and a sentiment...


To create this card I used:

* Tando Creative Stencil - Arrows
* Tando Creative Stencil - Dots
* Tando Creative - Butterfly Grab Bag

Thank you for looking and happy crafting!

Jane xx

Saturday 7 September 2019

'Live For Now' Autumnal Card for Bee Crafty

Hello!
 
As we move towards Autumn I decided to make this card to share with you today on the Buzzy Goings on at Bee Crafty blog...


* I started by using some distress oxide ink pads (fossilized amber, wild honey, dried marigold, fired brick, vintage photo) to build up layers of ink for my backgrounds.
 
* Next I used some of the same inks to add some stamping using the Stitch Borders.
 
* To create some extra spots of light I stencilled using buff coloured paint through the circles d'inkable.
 
* Onto the same coloured background I stamped the smaller maple leaf 3 times using Versafine ink in sepia then coated the lines with clear embossing powder which was heated.  Once I had cut them out they were added to the panel using glue gel.
 
* Finally I stamped a couple of the sentiments from the Small Words set onto the same background then cut out and added them to the card...


The products used were:

* Beautanicals - Maple Leaf Set
* Art Stamps - Stitch Borders
* Wordage - Small Words
* D'Inkable - Circles
* Distress Oxide Ink Pads

The Maple Leaf stamp set is currently at a sale price as part of the Wednesday Wow over on the website, along with some other products, so is well worth taking a look at!

Thank you for looking and happy crafting!

Jane xx

Monday 2 September 2019

'Mandala Canvas' with HunkyDory Crafts

Hello!

About a week ago I made a video and blog post using some dies and powders from HunkyDory Crafts...

You can find it here https://isleofcraftycreations.blogspot.com/2019/08/mandala-card-with-hunkydory-crafts.html and a link to the video.

Today I have created another project using the Marvellous Mandala Moonstone dies and Prism powders, but this time I have also included the Mandala stamp set - Perfect Petals.  I have a video of the process over on my YouTube channel:

https://youtu.be/f-LTSqD6ggw

Here is the completed project...

 
Full disclosure: I have been given these products to review for free and to keep, however any views I have are my own and will be totally honest.
 
This time I decided to create a project on a canvas board and wanted to use the die cuts in a couple of different ways.
 
I cut the mandala corner out of 300gsm cardstock to use as a stencil, and this worked really well with my modelling paste to create some background texture.  I also wanted to use the die cuts in a more 3D structural way so I cut the die out 6 times so that I could stick 3 layers together twice.  I used a strong acrylic based glue to make them really sturdy and the effect was much like a chipboard embellishment...


Once again I used the pigment powders, from both set 3 and 4, layering them up as required.  When added to the gessoed canvas they created a paler look than when they were added to the watercolour cardstock, so when I had created my stamped mandala I added some white gesso with dry brushing to make it more pastel to tone better with the rest of the canvas. 
 
The stamp is beautiful and as with all the HunkyDory sets they are great quality and provide a really clear image.  I also liked the way the mandala can be cut out at different sections to layer up as well as making a striking image on its own...
 
 
I also used the other dies from the Marvellous Mandala set to create some flowers. This time I cut them using white vellum which cut really well and created a lovely soft effect...
 
 
To see how I put the project together you can watch the video at:
 
 
Here are links to the products that I used:
 
 
You can also view the whole range on the website at: https://www.hunkydorycrafts.co.uk/
 
Thank you for looking and happy crafting!
 
Jane xx


Sunday 1 September 2019

Craftascope September Blog Hop - Flowers


 Hello!

Welcome to the September Craftascope blog hop and this month our theme is 'Flowers'...


Craftascope has many floral themed products including stamps, stencils and dies so this seemed like an ideal theme especially as we approach the end of summer.

For this blog hop the main focus must be created using Craftascope products but other companies products are also permitted, if you would like to take part in future blog hops you can contact Jacqueline Bobeldijk-Schilder via the 'Craftascope Makes' face book group..

https://www.facebook.com/groups/843601679091889/

I recently purchased a Heidi Swapp Memorydex Spinner with dies to make and decorate rolodex style cards so I decided to decorate one of these to display on my spinner...


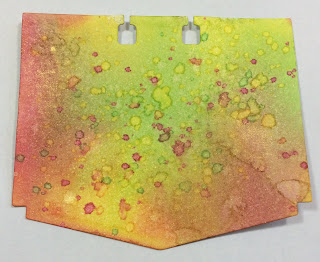
I started by die cutting one of the cards out of mixed media cardstock then coloured it using Pearlywinks ink sprays.  After first spraying the colours I also added splatters by taking out the spray nozzle and dripping ink onto the card (hot pink, yellow, lime green & golden shimmer)...


Next I used the 'Flower Flurry' stencil with some clear texture paste and left it to dry overnight - it may be a bit tricky to see it in the picture...


To make the flowers stand out I used distress ink in black soot over the entire card, then wiped away the excess from the areas where the texture paste created a resist...


To bring a bit of lightness back into the flowers I sprayed a bit more golden shimmer over the card then used my white posca pen to add some dots and splatters of paint...


To create my focal images I sprayed some more pieces of the mixed media card using the inks (hot pink, pumpkin orange, golden shimmer, lime green and yellow) then stamped some of the flowers from the 'Floral Scent' set and leaves from the 'Floral Companions' set.  I used Versafine black ink and added clear embossing powder over the top.  I chose a sentiment from the 'Handy Helpers' set to stamp onto black card and heat emboss in white...


I then adhered the pieces to the memorydex card...


All of the stamps and stencils that I used are from Craftascope and can be found on Nick's ETSY store:
 
Pearlywinks Sprays can be found on their website:
 
A big thank you once again goes to Jacqueline for organising the blog hop and the next blog you visit will be hers...
 
 
Thank you for looking and happy crafting!
 
Jane xx
 
http://l.facebook.com/l.php?u=http%3A%2F%2Fstempelhotspotzaandam.com%2F2019%2F09%2F01%2Fcraftascope-monthly-blog-hop-september-2019-bloemen-flowers%3Ffbclid%3DIwAR3ui2pUJz-Nh8WZ62ARJIgBKfrBPQlUOT6u53R-1b_3WeboihJaOqeppxY&h=AT3n6zQaWwtD23YCP4RvR6rox89YJAUzeO-opDaLyHSO92urh0LSQwhIsfNmPRQ1FX1yM9a1T7rD5S4YYw7VgQpbP4t8PUXApOIgAx53kmzgktU6Vu6Ew_t1-URLOATfKY8