Thursday, 19 May 2016

Leonie Pujol: Kaleidoscope Dreams

Hello once again!

I hope you enjoyed the launch of Leonie's new stamps last night?

I have another sample to show you today and whereas last nights sample was quite fresh and pretty, today's is a bit more vintage and grungy, just as I like it!!


* I started with a MDF free standing tag (from Inky doodles) that I painted with white gesso to prime the surface, then brown paint so that the back would match the project.

* Using the tag as a template I cut a piece of card to the correct size then embossed it using the distress textures embossing folder.

* Using some of the Spectrum Aqua markers, I made a palette of colour on acetate then spritzed with water and coloured my card. 

* This was then stuck to the MDF tag using cosmic shimmer glue and the edges filed with a sanding block to make the card fit snugly.

* Using gold Pebeo gilding wax I highlighted the texture and then used a gilding pen to go round the edges of the tag in copper.

* The wings from the Kaleidoscope Dreams stamp set were stamped three times using flitterglu and then gilded with chocolate box gilding flakes.  These were then cut out.

* Two sentiments were chosen from the stamp set and heat embossed onto vintage gold card using gold powder.  Then matted and layered onto brown card.

* All the pieces were then placed onto the tag using glue gel.

* Finally I took a piece of white gauze and coloured it using down the same Spectrum Aqua pens, this was then tied through the top of the tag as a finishing touch...


I love this vintage type of style, especially with all the texture and I hope you have too.

I will be back tomorrow with a final sample for this week from the new launch, so I look forward to seeing you here again.

Please also take a look at the other design team members blogs to see what they have been doing with the stamp sets...

* Nick: http://nickinbarnsley.blogspot.co.uk/
* Katrina: http://cornishkat.blogspot.co.uk/
* Elaine: http://cakecoffeefcraft.blogspot.co.uk/

Jane x


Wednesday, 18 May 2016

Wonderful Wednesday: Leonie Pujol - Flight to Freedom

Hello!!

I am so excited to now be able to show you one of the samples that I made for tonight's launch of the brand new Leonie Pujol stamp sets!

I totally love butterflies and sentiments so this new collection was an absolute joy for me to work with, so of course the first project that I want to share with you is going to be full of butterflies plus a fantastic sentiment!

The plaque is made using the 'Flight to Freedom' stamp set and it started with an MDF frame...


After coating it with gesso to prime the surface I painted the whole frame using Lace Americana Décor paint then a layer of crackle glaze.  Once it had dried I painted the frame with blue Americana Décor paint and watched the crackles appear!  Once this was dry it was covered with varnish to stop the paint from flaking off...


To create a panel for the centre I used Spectrum Aqua pens.  I chose a few different shades of blue and scribbled them in patches onto a piece of acetate.  After spritzing the ink with water I pressed a piece of card into it and moved it around to make sure all the areas were covered...


To add some extra interest to the frame I stamped one of the butterfly stamps from the set around the frame using versamark then embossed with white powder...


Using a Versafine ink pad I stamped out a selection of the butterflies and then cut them out.  I used Spectrum Aqua pens and a water brush to colour them in then sprayed them with Pearl Diamond to add extra shimmer...


I chose one of the sentiments from the same set to stamp onto the same coloured card as the background.  This was then cut out using a pierced flag die from Sue Wilson and backed onto black...


Finally the pieces were placed and stuck to the frame using glue gel...


I hope you like my first project!  I really enjoyed making it and hope you will stay tuned to all of Leonie's demonstrations.  They continue tomorrow at 9am, 12pm, 4pm and 7pm.

If you go on over to my design team mates blogs they will also have some inspiration to show you...

* Nick: http://nickinbarnsley.blogspot.co.uk/
* Katrina: http://cornishkat.blogspot.co.uk/
* Elaine: http://cakecoffeefcraft.blogspot.co.uk/

So do please go and take a look :)

I will be back tomorrow morning with another sample from the shows!

Enjoy the rest of your evening,

Jane x

Wonderful Wednesday: Advance notice...


Good morning!

A very quick post to let you all know that tonight on HOCHANDA Leonie Pujol is launching her latest stamp sets! 

As a member of the design team I will have samples that I made on the shows tonight and tomorrow and to join in with the launch I shall be posting one of the projects made with extra photos and info at 8pm (BST)!  Then I will be posting two more projects, one on Thursday and one on Friday at 8am each day.

The TV shows are on at the following times (all British Summer Time)...

* Wednesday 18th May - 8pm
* Thursday 19th May - 9am
* Thursday 19th May - 12pm
* Thursday 19th May - 4pm
* Thursday 19th May - 7pm

To watch you can tune in to...

Freeview - Channel 39
Sky -  Channel 663
Freesat - Channel 817

Or you can watch online at...

https://www.hochanda.com/

Hope to see you soon!

Jane x

Tuesday, 17 May 2016

Design Team Tuesday: Thank you Friend


Hello again!

Today I am posting a project with my design team hat on using the Leonie Pujol mask and stamp sets.

As I have already shown you the samples that were made for the launch shows last month I have made this card especially for today's post.

I will be entering this project into the following challenges...

* Sweet Sketch Wednesday - Sketch #89

* Sweet Stampin' Challenge - Thank you

Every now and then I like using a sketch to follow for a card design as otherwise I do find that I tend to stick to the same sorts of layouts.  So using the challenge helped me to find the starting point for my card.
I also wanted to incorporate one of the masks with another sentiment to show how they can be adapted to make them even more versatile and so I chose to use the 'friend' mask alongside a thank you stamp from a Stampin'Up! set.  The main piece of card was cut using a Sue Wilson pierced square and the sentiment using a pierced flag (one of my favourite dies!) ...


Once the mask had been adhered using stick and spray, I coloured both the card and the sentiment using Dried Marigold and Mustard Seed distress inks.  When I removed the mask I used an adhesive rubber to remove any traces of the spray and then, because I wanted the word to match with the rest of the stamping, outlined it with dots using a black pen...


I then chose a selection of floral stamps from the various sets.  (I have to admit that I have not noted which stamps come from which sets as I tend to just mix and match from wherever I feel like). I then used Versafine ink with the larger flowers to create a pattern that I was happy with, then filled in with the smaller flowers, using distress inks with the groups of flowers for a more subtle finish...


To tie the flowers in with the base colours I used some Pitt Artist pens to colour the main flowers (scarlet red, orange glaze, dark chrome yellow, cadmium yellow) and then used went over some with glossy accents and the others with a clear spectrum sparkle pen.  To add an extra bit of glitz I dotted some diamond stickles around the smaller flowers...


These were both then mounted onto black card...


To make the other elements of the card I then cut two strips of card and coloured and stamped them in the same way...


The final element was to create a flower using the Delightful Daisies stamp and die set from Heartfelt Creations.  This was coloured with the same distress inks as the rest of the cards and then layered up with some more stickles added to the centre...


Finally the card was put together and the main image layered up with some foam tape...


For more ideas and inspiration you can also take a look at Leonie's blog and the other members of the design team...

* Leonie: http://leoniepujol.blogspot.co.uk/
* Nick: http://nickinbarnsley.blogspot.co.uk/
* Katrina: http://cornishkat.blogspot.co.uk/
* Elaine: http://cakecoffeefcraft.blogspot.co.uk/

Tomorrow morning there will be a special short post as there is a new launch tomorrow evening of the next release of stamps from Leonie on HOCHANDA, so do please take a look to see what is happening, where and when!!

Have a lovely day,

Jane x

Monday, 16 May 2016

Mixed Media Monday: Monster Fun!

Hello, and welcome to a new week of craftiness!!

This week I will be posting a project each day right up to next weekend so watch this space for exciting announcements!!

On Friday I said that I would maybe be making something steampunky for today, I didn't do that in the end but I certainly went for a project that was far from flowery!

I will be entering this project into the following challenges...

* That's Crafty - Friday The 13th Challenge Part 1
* Sisterhood of Snarky Stampers - F is for Fugly
* Crafty Calendar - Things with Wings

For this project I wanted to create something a bit monstrous but still lots of fun so got out my monster stamp set from Dylusions. 
I started by stamping out some of the pieces using Versafine ink then coloured them with Spectrum Aqua pens.  I had no colour scheme in mind, I just went with bright and slightly clashing colours! 
Then when they were all coloured I coated the pieces using glossy accents and left to dry thoroughly.  The display case was stamped twice, once on card then on acetate, and cut out and layered up, fixing the parts together with mini brads.
The sentiment was stamped from a set by Stampers Anonymous and cut down to size...


After the pieces were made I had to decide what I wanted them to go on!!  I was going to make a card but then decided that they would be more suited to a plaque.  I chose a frame that would be just the right size for the pieces and drilled two holes at the top then coated with white gesso.  I then used light paste to create texture around the frame using the texture mesh stencil from Memory Box...


When choosing a colour I wanted to stick with the monstrous theme and also match in with some of the pieces that I had already coloured so painted the whole frame using Lime Marmalade paint from IndigoBlu.  This then had some silver gilding wax added to highlight the texture and create some contrast. 
I used an ink splat die by Tim Holtz to cut a shape from a piece of vintage silver card and then put it through an embossing folder to add extra texture.  The piece was then placed into the middle of the frame...


Once I had tested out some different ways of laying out the pieces I finally decided how I wanted them to be placed.  I added some Marigold distress ink to the sentiment then stuck all the pieces into place using glue gel...


Totally different to a lot of my usual pieces but I really like the bright colours and the fun characters so this may get pride of place somewhere in my home!

I will be back tomorrow with a project using the stamps and masks from Leonie Pujol that were launched a few weeks ago so hopefully you will pop by again to see what I have made this time.

Have a lovely week,

Jane x

Friday, 13 May 2016

Funtastic Friday: A quick birthday card!

Hello, I am a bit late today but have still just about made my Friday post!!

My little boy is off to a birthday party on Sunday for his little friend who will be 4 so I decided to use the same fairy stamp that I made a card with recently to make a personalised card for her...


I started by stamping the Lili of The Valley fairy in Versafine as well as the sentiment from a Phil Martin set.  They were then cut out using Sue Wilson's Italian Circle dies and a pierced flag die.

I wanted quite a subtle look to the colour but also a bit of shimmer, so used Spectrum Aqua pens but with a clear sparkle pen to apply them.  Then I added some colour around the edges using dusty concord distress ink.

The pieces were mounted onto purple card and then onto a 6" square base card. I wanted to make the card more personal so cut matching purple pieces with a small banner punch from Stampin'Up! and stamped the letters of the little girl's name to add to them. 

They were all stuck down with glue gel then some paper flowers added as a finishing touch.

Over the weekend I will be doing some mixed media and am thinking that after all the flowers of the past week I may go a bit steampunk or industrial!  Hopefully I will see you on Monday,

Jane x


Wednesday, 11 May 2016

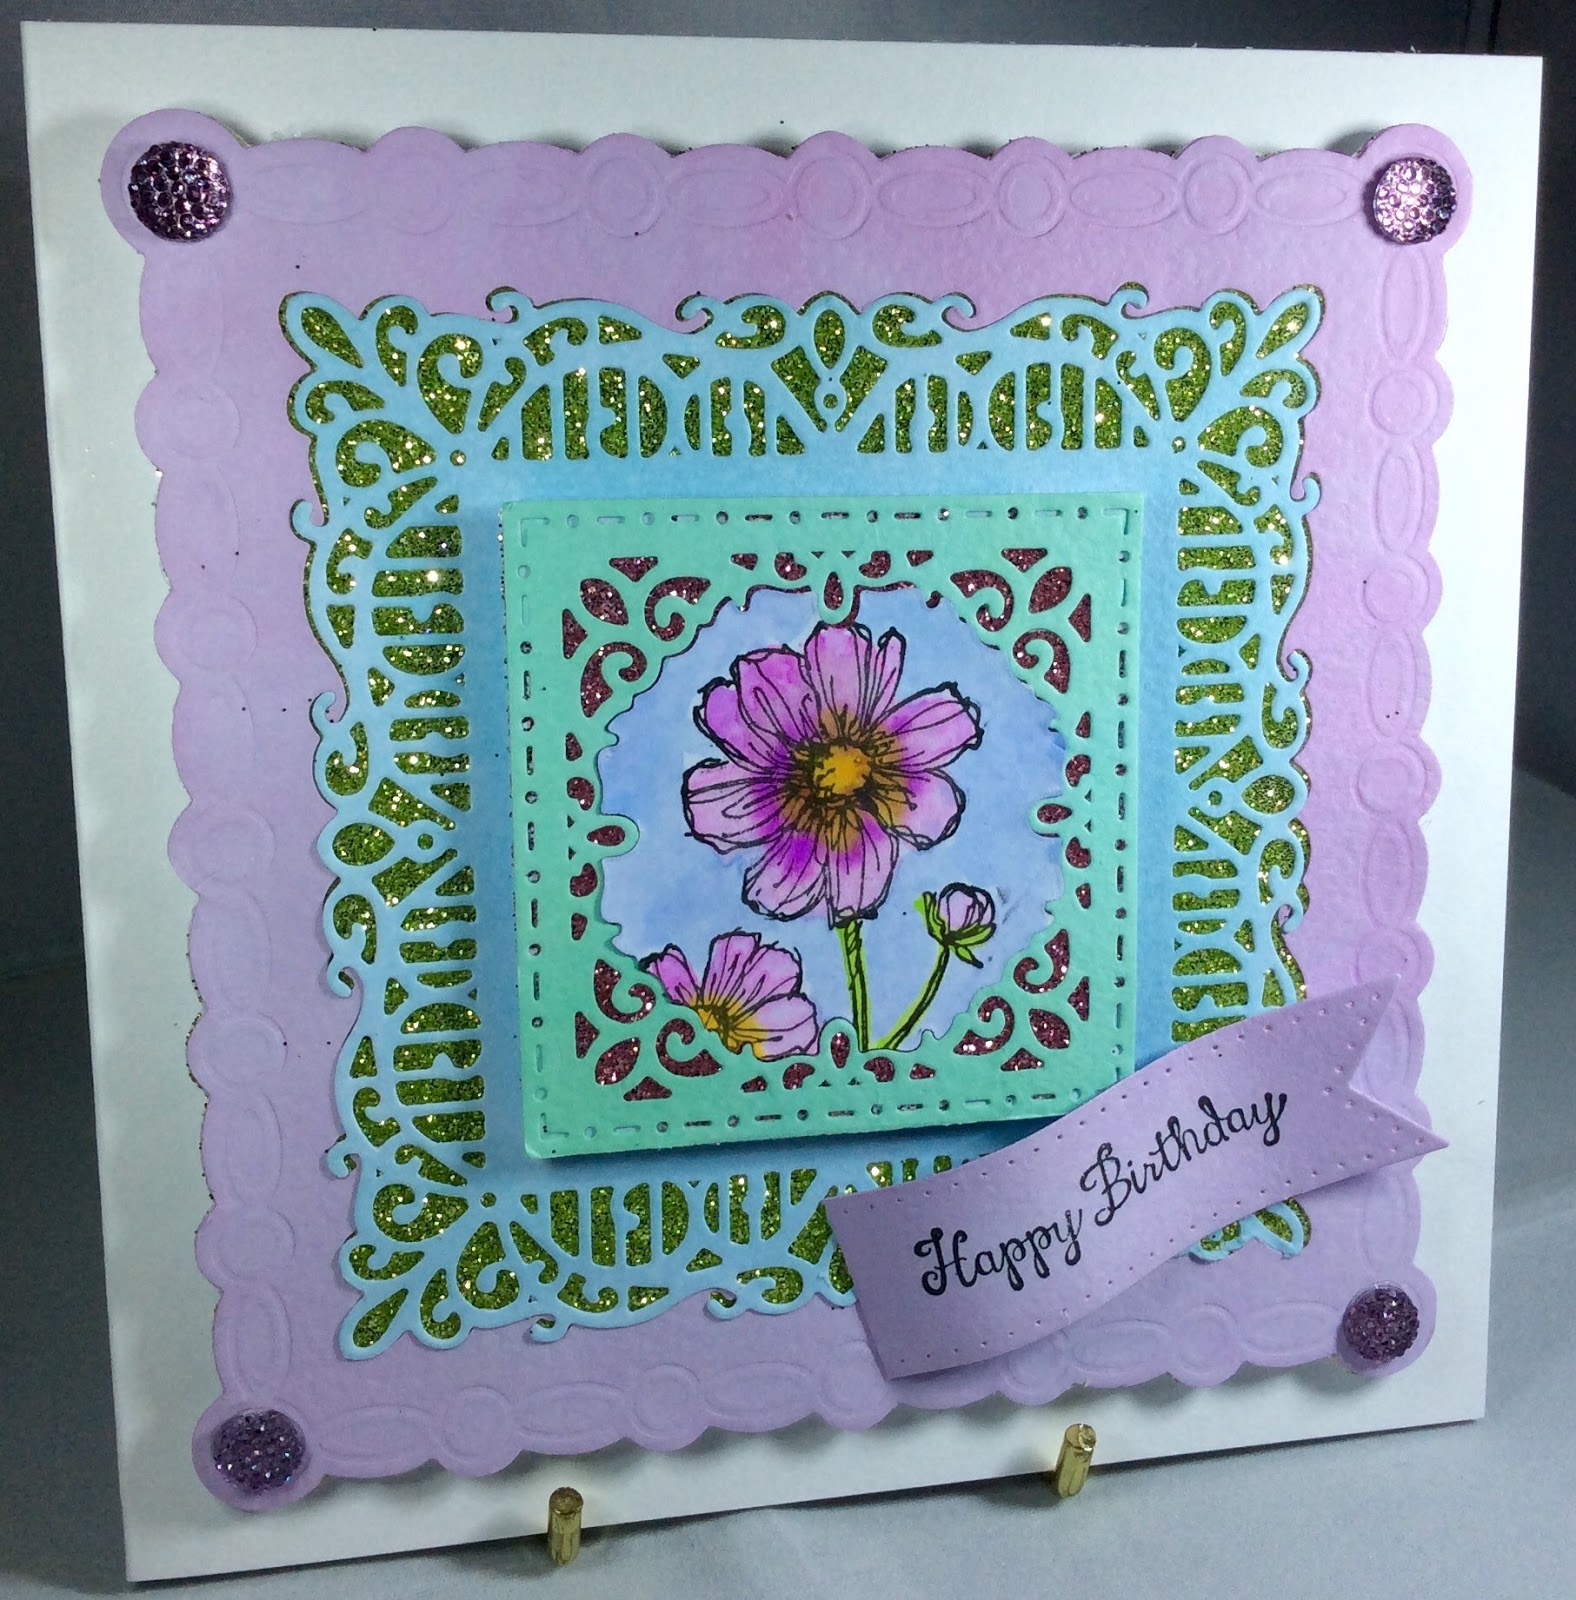
Wonderful Wednesday: Simple Flower Card

Hello again!

Yesterday I decided to get some stamps and dies out of my crafty cupboard that I haven't used very often to have a play around with.  I love seeing cards that are layered up using dies as I always think they look stunning, but I haven't really tried it much so I decided to get out my 'Madison Square' set of dies by Sue Wilson to have a go!

I am entering this card into the following challenges...

* Fantasy Stampers - Flower Power
* Craft Stamper - Anything Goes
* Crafty Cardmaker - Pearls or Gems
* Crafting from the Heart - Anything Goes
* Sweet Stampin' - May Flowers

Because there was going to be detail in the dies I went for a simple floral stamp for the focal image from a set by Stampin'Up! (Bloom with Hope).

I started by cutting the layers of the die set out to see how they looked.  My initial idea for how they were going to be layered actually changed by the end of the card as I decided to inlay the different layers rather than stack them all. 

Two of the layers were also recut with double sided adhesive so that glitter could be added to some of the cut away spaces.

Once the layers were cut I stamped one of the flower images using black Versafine and then coloured it using Spectrum Aqua marker pens.  These were the colours that I then used to guide me when I tinted the different layers using Cosmic Shimmer colour cloud inks (Frosty Sky, Frosty Aqua and Frosty Heather).  I also used glitters that matched the colours to cover the double sided adhesive but on contrasting layers.

Once the pieces were inlaid and layered up, I added a sentiment from the stamp set (cut out using a pierced flag die) and added gems to the corners...


This really was a card where I did not know what it was going to look like until it was made!

However I am really pleased with how it turned out and it has encouraged me to have a play with more of the stamps and dies that I tend not to use.

I will be back again on Friday, but until then happy crafting!

Jane x