Saturday 26 December 2020

Monochrome Card With Love

  Hello!

This week on the Bee Crafty blog I am sharing a simple card using black and white...

1) I started by stamping the flower from the Doodle Art Butterfly set onto a piece of black card.  I used a clear embossing ink then heat embossed with superfine white powder...


2) After that I stamped the flower again, this time onto a piece of white vellum, then cut out the main flower and leaf.  I also tore a piece of vellum the width of the card and stamped and embossed a border from the same set onto it...


3) Next I adhered the border with tape and used glue gel to create some dimension with the flower and leaf...


4) Finally I stamped out the 'With Love' from Everyday Sentiments 2 onto black card and embossed in white, before matting it onto white and layering up onto the card with foam tape.  I also added a few clear gems...


Here are the products that were used:


Thank you for looking and happy crafting!

Jane xx


Saturday 19 December 2020

Hochanda Queen Bee Journaling samples

  Hello!

This week on the Bee Crafty blog I am sharing the DT samples that I made for this weeks Hochanda show...


Thank you for looking and happy crafting!

Jane xx


Saturday 12 December 2020

Large Tag Journal Spread

  Hello!

Today on the Bee Crafty blog I am sharing an art journal spread that I made in my tag journal created using tags from the tag die set...


1) First the double page spread was covered using some washi tapes...


2) To tone the tape down a bit I used a thin coat of white gesso...


3) As there was now a coat of gesso this made it much easier to blend some distress crayons across the spread...


4) To add extra background interest I then used the circles d'inkable to wipe away some of the crayon with damp kitchen roll...


5) The Roman Numerals stamp was then stamped along the edges using black archival ink...


6) At this stage I felt the black was too strong so added some more white gesso...


7) I then used one of the stitch borders to add in some more detail...


8) Next I stamped out the Large Butterfly and after cutting it out divided it into two pieces, one for each side of the spread...


9) Finally I added  circles from the Texture, Film Strip and Circles set, then a sentiment from Ticker Tape 3...


Here are links to the products that were used:


Thank you for looking and happy crafting!

Jane xx


Saturday 5 December 2020

Christmas Gift Bag for Bee Crafty

  Hello!

This week on the Bee Crafty blog I am sharing a gift bag that I put together using elements that I had previously created...


I started by cutting a piece of kraft card measuring 5" square and put a clear embossing ink through the dahlia inkable before embossing with white powder.

The poinsettia and snowflakes had been previously stamped, cut out and coloured.  I had used ecoline markers to colour then after layering added glossy accents and fine glitter (one of my favourite things to do when making toppers).

I created the bottom layer of the poinsettia by adding the bits I had cut away from the top flower layer, colouring them green to add a contrast.  They have been attached to the bottom of the flower with a bit of glue and arranged to create the extra layer.

The sentiment was taken from the robin set and then layered onto some white glitter card that I found lurking at the bottom of my stash!

The final stage was to stick it all together onto the front of a gift bag...


Here are the products used:


Thank you for looking and happy crafting!

Jane xx


Saturday 28 November 2020

Winter Wonderland Tag for Bee Crafty

  Hello!

This week on the blog I am sharing a tag that I have made...  


I seem to be in a bit of a blue phase at t he moment with snowflakes as my theme! 

These are the steps of how I made the tag:

1) I cut the two largest tags from the tag die set out of watercolour card.

2) Using a brayer I applied distress oxide ink (peacock feathers & broken china) to part of the smaller tag.

3) The smaller snowflake stamps and the text stamp from the Doodle Snowflake set were stamped using distress oxide inks (salty ocean, broken china & faded jeans).

4) Faded jeans oxide was used again to stamp the sentiment.

5) I stamped the larger snowflake out onto watercolour card twice and cut them out.  These were then coloured using Ecoline watercolour pens.  I layered them up and added glossy accents with some glitter whilst it was still wet.

6) Finally the elements were added and some ribbon tied on before layering the tag onto the larger one with foam tape.

Here are links to the products used:

Doodle Art Yuletide Stamps - Snowflake (regular)

Tag die set

Distress Oxide Inkpads

Ecoline Pens

Glossy Accents

Thank you for looking and happy crafting!

Jane xx

Saturday 21 November 2020

Snow Blizzard Hochanda show samples for Bee Crafty

  Hello!

Today on the Bee Crafty blog I am sharing the samples that I made for this weeks Hochanda show...


Thank you for looking and happy crafting!

Jane xx


Saturday 14 November 2020

Winter Doodle House Card for Bee Crafty

  Hello!

This week on the Bee Crafty blog I am sharing a fairly quick and easy card...

1) I cut a piece of watercolour card 5 1/2" x 3 1/2" and using the horizons 2 template coloured the sky with Broken China distress ink...


2) Next I added more stenciling through the snowflakes multi inkable using Faded Jeans distress ink,,,


3) Then I stamped the Sky Terrace regular doodle house stamp onto watercolour card twice using black archival ink.  I cut them out and after colouring with Ecoline pens and a waterbrush I layered the roof and door for extra dimension.

For a sparkly snow look I dabbed on some of the moondust stickles gel.

The sentiment was stamped from the small winter words and a bit of distress ink added over plus some archival around the edges...


4) The background was layered onto black card then onto a 6" x 4" card blank.  The house and sentiment were added using glue gel...


Here are the products used:


Thank you for looking and happy crafting!

Jane xx

Saturday 7 November 2020

Cone Flower Christmas Tree Card for Bee Crafty

  Hello!

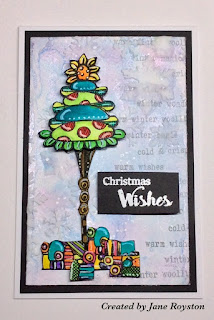
I have decided to get a bit more organised with my Christmas cards this year and thought it would be fun to create something a bit different and quirky...


1) I created a background on watercolour card using metallic watercolour paints and white gloss spray...


2) Then I used grey ink with a mixture of sentiments from the small words winter set and stamped them down the side of the page.  I then used the same ink to edge the page...


3) After that I added some white texture paste through the snowflake d'inkable ...


4) Next I stamped one of the cone flowers (Beautiful Life) and some of the background stamp in black archival ink and coloured them with Ecoline markers.  I also used a white posca pen to add some highlight details...


5) Finally these were added to the card front which was layered onto black.  The sentiment was stamped using white embossing powder onto black card...


Here are the products used...


Thank you for looking and happy crafting! 

Jane xx