Saturday 18 July 2020

Bright Butterfly Canvas with Bee Crafty

Hello!

This week on the Bee Crafty blog I am sharing a 12" x 12" canvas that I created to hang in my living room...


This project was a labour of love as I really wanted to create something that used as many of my stamp designs as possible and was really bright to contrast with our cream walls.

1) I started by brayering Calypso Teal Dylusions paint onto the canvas...


2) Next I brayered Lime Dylusions paint onto the bottom part of the canvas...


3) Using the large Fernando inkable with Polished Jade Dylusions paint, I stenciled on top of the green area...


4) After that I added stenciling using the Circles d'inkable and White Linen Dylusions paint...


5) Next came the part that took the longest but was really enjoyable to do.  I stamped a range of the different flowers, leaves and butterflies using Memento ink then coloured them using alcohol pens.  After that I coated them using glossy accents and left them all to dry thoroughly...


6) I then started arranging the flowers and leaves across the bottom part of the canvas until I was happy with the placement then stuck them down using glue gel...


7) At this point I decided that I wanted a bit more interest in the sky area so I used the Texture Circles with different shades of blue Archival inks...


8) Then I added the butterflies...


9) Finally I had to decide if I wanted to add any words (which of course I did!) and how I wanted them to look.  So I stamped the same word out in two different ways and then with my families help decided which way we wanted to use...


Here are a few close up pictures...


Links to the products used can be found below...


Thank you for looking and happy crafting!

Jane xx

Saturday 11 July 2020

Butterfly Blossom Card for Bee Crafty

Hello!

This week on the Bee Crafty blog I am sharing a fairly quick and easy card...


1) I started by stamping the Blossom Butterfly onto a piece of stamping card. 

2) Then I stamped the butterfly onto masking sheet, cut it out and covered the butterfly before blending on blue distress ink.

3) Next (keeping the mask in place) I stamped some of the Script XL in the same blue ink.


4) I took the sentiment from the same butterfly set and stamped it onto the card using a plum archival ink.

5) After that I took off the mask and coloured the butterfly image by water colouring with inktense blocks.

6) Then I added some extra details using a white posca pen.

7) Finally I stamped out the sentiment to add to the card and matted and layered onto purple pearl card and a card blank.


Here are links to the products used:


Thank you for looking and happy crafting!

Jane xx

Saturday 4 July 2020

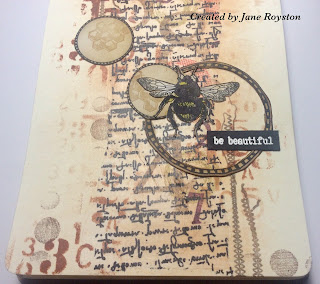
Be Beautiful Journal Spread for Bee Crafty

Hello!

This week on the Bee Crafty blog I am sharing a journal spread with you...


I used my small flip journal from Dylusions but decided to put it into a portrait position.

* To make my first layer I created my own piece of collage tissue... 

1) I took a piece of ordinary white tissue paper (the sort that is used to wrap ornaments in gift shops!) and stamped onto it using archival ink pads.

2) I built up my layers of stamping starting with the Script XL, then Numbers, Heraldic Alpha and finally circles from the Texture and Film Strip set.

3) Once I was happy with the look I tore strips from the piece and attached it down the centre of my pages using distress collage medium...


* At this point the edges of the tissue were too straight and obvious to me so I added some stenciling using the Metal Alpha dinkable and burnt sienna acrylic paint.  

* Then I used what was left on the brush with a bit of water to colour onto the tissue and the edges to create a softer look...


* Next I wanted to add in some more stamped details to connect the tissue column to the rest of the page.  

* I used the Stitch Borders stamp set with coffee archival ink and added some of the stitching and the small circles...


* I wanted to echo the circles in my main focal points so used the circle stamps from the Journaling Blocks for this, cutting the smaller ones out whole and the centre from the larger circle to create a ring. 

* I coloured them using vintage photo distress ink and added some of the honeycomb from the Bee Monarchy set.  

* I then also stamped and cut out the medium sized bee...


* I added these to the spread using some dries clear glue...


* For the final touch I stamped one of the Small Words sentiments onto black card and embossed with white powder before adding it to the spread...


Here are the links to the products used:


Thank you for looking and happy crafting!

Jane xx