Saturday 27 April 2019

'Butterfly Dreams' Art Journal Spread for Bee Crafty

Hello!
 
This week on the Buzzy Goings on at Bee Crafty blog I am sharing some art journaling using the doodle art stamps...
 

I created a background in my thick watercolour paper journal using acrylic paints then added stencilling using d'inkables.  Next I added background stamps using the doodle art sets then created circles with a Stabillo all pencil that is water soluble...


Next I used a brush and water to drag the black line out so that the circles became highlighted. 
The butterflies were stamped, cut out and coloured before being added to the pages.

I stamped the leaves directly onto the pages then coloured them as well before adding a sentiment...


I finished off with some doodling and liquid pearl drops.

These are the products used:

* Art Stamps - Doodle Art Butterfly #1 (regular)
* Wordage - Ticker Tape 2
* D'Inkables

Bev and Sam are bringing some gorgeous new doodle stamps to HOCHANDA on the 29th of April so I hope you'll be watching!

Thank you for looking!

Happy crafting,

Jane xx

Wednesday 24 April 2019

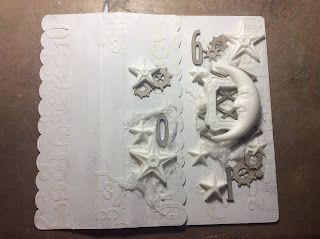
'Shoot for the Stars' Art Journal Cover for Tando Creative

Hello!
 
This week on the Tando Creative blog the theme is 'Texture Paste' and I love using all sorts of texture pastes as well as texture in general!  I have been saving the fab art journal starter kit from Tando to create something special with and this was the week!!...
 

I started by using white modelling paste through the long numbers stencil on the covers, then covering it with white gesso...


Next I added numbers, diamond grid and cogs from Tando along with some pieces that I had cast in resin from moulds.  Underneath some of these I added some gauze.  All of this was stuck down using heavy body gel ...


To create even more texture I added some sand texture paste and art balls...

 
To even everything out and prepare a base for the colour I painted everything with white gesso...


To complete the cover I added chalky paint from Decoart, metallic paint and gilding wax.  Then faux gems were added along with a sentiment from Bee Crafty...


The pages and cover were finally put together using thread, needle and fab instructions that come with the kit.

Here are the products that I used:

* Art Journal Starter Kit
* Tando Minis - Cogs
Tando Grid - Diamond
* Stencil - Numbers
* Decoart - White Modelling Paste, White Gesso, Sand Texture Paste, Heavy Body Gel
* Decoart - Chalky Finish Paint

There will be more textural inspiration from other members of the design team this week, so I hope you pop back to have a look.

Thank you for looking and happy crafting!

Jane xx

Saturday 20 April 2019

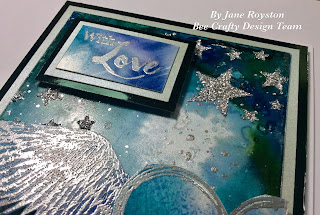
Winged Love for Bee Crafty

Hello!

Today on the Buzzy Goings on at Bee Crafty blog I am sharing a card I have made with an alcohol ink background...

During the week I made a similar background with alcohol inks and the seahorse stamp set which I made a video of, if you would like to see the process I have added the video below...


As I was playing with the alcohol inks in different ways on the Yupo paper I made a few backgrounds, two of which I decided to use in this project.  The piece on the right has had Pebeo mixtion glue splashed on it and then silver foil added when tacky...


Next I used the stars d'inkable with some glitter texture paste as the background seemed to have a galaxy look to it...


For my main focal points I stamped one of the wings, the medium style wire heart and a sentiment onto my other background using versamark ink and silver embossing powder.  These were then cut as required (including part of the heart as I wanted the image to come into the edge of the card)...


Once everything was dry I matted and layered the main piece and then added the images using glue gel...


 To make my project I used the following products:


Thank you for looking and happy crafting!

Jane xx


Saturday 13 April 2019

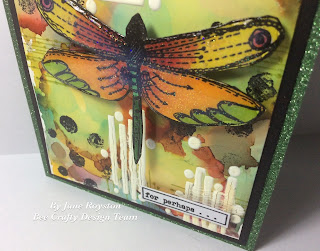
Live Like a Dragonfly for Bee Crafty

Hello!

Today on the Buzzy Goings on at Bee Crafty blog I am sharing a card that I made using some new purchases!

I was lucky enough to attend the Crafting at Ally Pally show last Sunday where I visited Bev, Dave and the fabulous Bee Crafty stand.  I had my list ready so thought I would share this project with you using some of those goodies...


I started off by using a piece of Yupo paper by Ranger.   This is something that I had wanted to try for a while as I do have alcohol inks and I am always wanting to try different surfaces and mediums.  I dropped a variety of different coloured alcohol inks onto the paper and added drops of 90% alcohol into them as well.  I kept going until I was happy with the result...


Once this was done I used the Dots backdrops stamp with black archival ink and the little lines and dots stamp from the Doodle Dragonfly set with peeled paint archival ink.  On this surface the inks did not dry as they usually would so I added clear embossing powder over the top to seal them in...


To match the dots and lines theme I then used the new d'inkable of the same name with some crackle paste...


Whilst this was drying I stamped the dragonfly out onto card and then used the same sorts of colours as the background but with Faber Castel Pitt Pens. This was then covered with glossy accents and a sprinkle of fine glitter added...


Finally I stamped a sentiment from the Ticker Tape 2 set and put the card together onto a black mat then a green glitter card base.  I raised the elements up using glue gel to create a more dimensional finish...


Here are the products that I used:

* Art Stamps - Doodle Art Dragonfly Regular
* Backdrops - Dots
* Wordage - Ticker Tape 2
* D'Inkables - Lines and Dots
* Yupo Paper
* Distress Archival Inkpads

Thank you for looking and I hope you will be watching the Bee Crafty shows on HOCHANDA this coming Monday (15th April).

Happy crafting,

Jane xx

Saturday 6 April 2019

Doodle Stamp Keyring for Bee Crafty

Hello!

Today on the Buzzy Goings on at Bee Crafty blog I am sharing how I made a key ring using the new doodle stamps...


I love trying new products and mediums and a few years ago I bought some stampbord and inks as I wanted to try them out.  After using them a few times they ended up in my crafty cupboard forgotten about until recently when I noticed them and decided to have another go!
Stampbord is a piece of board that has fine layers of clay on top which means you can use etching tools to scrape back areas to create different layers of colour.

My starting point was a domino sized piece of stampbord...


For my first layer I applied blue ink using a piece of foam...


Next I stamped the vine and the lines from the Bird #1 set using black archival ink...


Then I used my etching tools to take some of the colour out of parts of the design and also to add white doodles...


Using a small paintbrush I coloured some of the white areas using some of the other inks...


Next I stamped one of the flowers from the Bird #1 set, coloured it and added glossy accents...

 
Because the stampbord can still be scratched into I added glossy accents across the whole piece to protect the surface, then put in a hole and eyelet for the key ring. I also added some dots of Pebeo relief and once clear and tacky added gold foil leaf over the top of them.  Gold gilding wax was used around the edges to create a more framed look.
 
Finally I attached the flower and added a word from the Ticker Tape Sentiments set...


To create this project I used:
 
 
Thank you for looking and happy crafting!
 
Jane xx


Friday 5 April 2019

Floral With Love for Craftascope

Hello!

I thought I would share a card today that I have made using some of the new floral stamp sets from Nick and Craftascope...


I have to admit that I love floral stamps a lot, so I wanted to feature them on this card.

To start I used Broken China and Crushed Olive distress ink with an ink duster brush to add colour to a piece of stamping card.  To add some extra texture I flicked some water across the card then after a few seconds blotted it with some kitchen roll...


Next I used one of the background stamps from 'Bloom and Grow' to add extra details using the same distress inks...


For my main focal image I wanted to have a frame so used the wreath stamp from 'Bloom and Grow', I stamped using sepia Versafine then added clear embossing powder over the top.  I also added the bow from the same set and coloured them using a brown Pitt Pen from Faber-Castell...


To create the main images I used a flower and leaf stamp from 'Bloom and Grow' and a sentiment from 'Positive Journey'.  I used the same ink and powder as the frame then coloured them using watercolours...


Once I had stuck these pieces to the card I was not totally happy with the spaces so added some extra flowers and another layer to the bow as well as an enamel dot...


To see any of the Craftascope products used you can view and purchase at Nick's ETSY shop: https://www.etsy.com/uk/shop/Craftascope?ref=search_shop_redirect
 
There are also more projects to view on the rest of the design teams blogs:
 
Nick - Barnsley Crafter
Katrina - Katrina's Crafting Blog
Natalie - Tilly-Anne
Bryan - Geezer Crafter
Cheryl - Chez101CraftyWaftyDoodah

Thank you for looking and happy crafting!

Jane xx