Saturday 26 June 2021

Vintage Bees ATC's

  Hello!

This week I have created some artist trading cards...


They were started from a bit of mopping up that I did on a Facebook live this week over on the Bee Crafty Facebook page... https://www.facebook.com/BeeCraftyStamps
I decided that they needed to be finished off, but instead of doing a photo step by step I videoed the process which can be seen here...


Here are some more close up photos...


Here are links to the products used:


Thank you for looking and happy crafting!

Jane xx


Saturday 19 June 2021

Altered Journaling Girl Tag

  Hello!

Over in the Bee Crafty Facebook group Sally is running the monthly challenge and this month the theme is to create a tag or journal page.  All you have to do is create a project using Bee Crafty products and put it into the challenge album and you are in with a chance to win a £20 Bee Crafty stamps voucher!!

So this week I thought I would create a tag...


1) I started by creating a background on my tag using two of the d'inkables with some distress inks - the d'inkable range are on special offer this weekend!


2) Next I cut out some circles from the Bee Crafty paper range.  To create my girl I stamped the top half of the Elegant Journaling Girl and some of the flowers.  This was then cut out and I altered her hair style and coloured her using Ecoline markers.  To create a longer skirt I cut out another piece of the paper and then a small butterfly wing from one of the sheets...


3) Then the pieces were layered onto the tag with some black ink added around some edges to make them stand out more...


4) Finally I added some of the flower stamps from the same stamp set and a sentiment from the Dylusions Back Chat stickers...


Here are links to the products used:

D'Inkables On special offer this weekend
Dylusions Back Chat Stickers

Thank you for looking and happy crafting!

Jane xx

Saturday 12 June 2021

Embossed Resist Butterfly Card

  Hello!

This week I am sharing a quick to make card...


1) I stamped two of the butterflies using embossing ink and heat embossed with white superfine powder.

2) Using a blending brush I added distress inks across the right side of the card.  I used worn lipstick, mustard seed and salvaged patina.

3) To create extra texture I splashed some water droplets across the ink and lifted it with a piece of kitchen roll.

4) The sentiment was stamped onto black card and embossed with white powder before putting the card altogether, adding a black card layer to lift the colours.


Here are links to the products used:


Thank you for looking and happy crafting!

Jane xx


Saturday 5 June 2021

'Love You To The Moon & Back' Card

  Hello!

This week I have created a card using lots of layers for the background and the beautiful La Luna stamp collection...

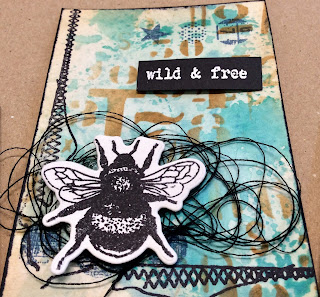
1) I started by applying 3 different colours of distress oxide spray (squeezed lemonade, picked raspberry & mermaid lagoon), spritzing and splattering.  I made sure that I dried between layers...

2) Next I added stenciling using the distress oxide inkpads (fossilised amber, salvaged patina & kitsch flamingo), and applied them through three stencils with various sizes of circles...


3) After this I added stamping using the La Luna stamp set and different colours of archival ink.  I then coloured some of the circles with a scribble stick and added some white paint pen dots...


4) To create even more layers I then stamped some of the textured stars using white and black ink...


5) Finally I used the extra piece of card that I had also coloured at the start to stamp out the moon and a sentiment using black versafine clair which I heat embossed with clear powder.  Then the pieces were all matted onto black card and mounted together on a card blank...


Here are links to the products used:


Thank you for looking and happy crafting!

Jane xx