Saturday 30 October 2021

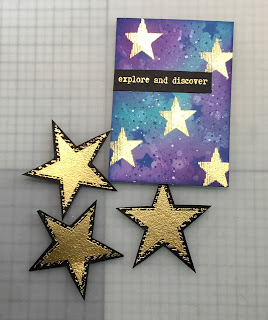
'Explore and Discover' A Lunar Themed Card

  Hello!

This week on the Bee Crafty Facebook page I did a Facebook live experimenting with some colour combinations to go with the new distress colour Villainous Potion.  As part of the live I created an ATC that had a space theme so I decided to use that as a topper for a bigger card...

1) I cut a piece of mixed media card and used Villainous Potion and Peacock Feathers distress inks with a blending brush.  To create a more distressed look I splashed droplets of water across the card and lifted some of the ink with a piece of kitchen towel...

2) Next I stamped the largest star from the Star Textures set using Prize Ribbon distress ink...


3) Taking one of the smaller stars from the set I stamped using the Villainous Potion distress ink...


4) Making sure the ink layers were dry I then stamped the star cluster using embossing ink and heat embossed using superfine gold embossing powder...


5) I stamped out the largest star again onto black card with the same ink and embossing powder to use alongside the ATC for the card toppers...


6) Finally I put the card together, using some black thread under the stars for extra texture and dimension...


Here are links to the products used:


Thank you for looking and happy crafting!
Jane xx


Saturday 23 October 2021

Hello Dream Girl Card

  Hello!

This week on the Bee Crafty Facebook page there was a brand new stamp launch!!!  The bundle prices will stay in place until the end of the month and can be found on the website in the October Launch section.

If you didn't see it, all the live demos will remain on the page and our lovely Ann also made a fab video which is on the Bee Crafty YouTube channel!

So this week for my blog post I have created a card using 2 of the new sets but added a different sentiment...


I didn't take step by step photos as it was a fairly straight forward card to make but this is what I did..


1) On a piece of watercolour cardstock I stamped the Dream image using black archival ink.

2) Then I coloured the image using Ecoline brush pens and matted onto black cardstock.

3) On a bigger piece of cardstock I stamped some of the Journal Elements #2 mostly in two of the corners and mounted the image on top with foam tape.

4) Finally I stamped one of the Everyday Sentiments onto black card with clear embossing ink and heat embossed with white embossing powder.


Here are links to the products used:

* Art Stamps - Art Journal Elements 2

Wordage - Everyday Sentiments 1

Ecoline Brush Pens

Ranger Superfine Embossing Powder - White

Thank you for looking and happy crafting!

Jane xx


Saturday 16 October 2021

Funky Card!

  Hello!

I have created a funky card for the blog this week that could be used for a number of occasions...


1) I started by layering up some distress inks one at a time and drying between each layer.  The colours were Carved Pumpkin, Wilted Violet and Twisted Citron, once the colours were smooshed on I also added a few orange splatters...

2) Using the same colours I then added some stamping with the Arrows set...


3) Next I stamped one of the borders from the Borders #1 set and added the smallest circle from the Journal Blocks with black archival ink...


5) Then the circles were coloured in with the distress inks and once dry white pen was added...


6) Finally a sentiment from Everyday Sentiments 1 was stamped out and mounted onto black card...


Here are links to the products used:


Thank you for looking and happy crafting!
Jane xx


Saturday 9 October 2021

Vintage Dragonfly Art

  Hello!

Following on from a Facebook live that I did this week using some of the collage stamps, I decided to make a card using the Dragonfly Art stamp...


1) I started by blending some Tea Dye and Antique Linen distress ink over a piece of card...


2) Using Rusty Hinge distress ink I added some stenciling through the Damask inkable...


3) Next I added Gathered Twigs distress ink through the Medieval Trellis inkable...


4) To break up some of the darker areas I then splattered Salvaged Patina and Antique Linen distress oxide sprays across the card...


5) After making sure the ink was dry and using an anti static bag, I stamped the Dragonfly Art stamp using clear embossing ink then heated it with gold embossing powder.  I re stamped the dragonfly onto card in the same way then cut it out and layered it onto the main stamped image...


6) Finally I stamped a sentiment from Small Words onto metallic card and embossed again with gold and then matted and layered the whole card...


Here are links to the products used:


Thank you for looking and happy crafting!
Jane xx


Saturday 2 October 2021

One Colour Card

  Hello!

I love using lots of different colours but this week I decided to see if I could create a card using just one colour.  I chose blue...


1) I started by using a blending brush to cover a piece of mixed media card with Tumbled Glass Distress ink.  Then after laying the Mandala 5 stencil on top, spritzed with water and lifted some of the colour away to create a ghosted effect...


2) Using the same stencil I then added some Broken China Distress ink through the Mandala at either side...


3) Next I took the Prize Ribbon Distress ink and swiped it all over the same stencil again.  I spritzed the stencil with water then placed it onto the card to create a print of the image.

4) With Chipped Sapphire Distress Ink I next stamped part of Time Measure on top of all the stenciling...


5) To create a frame I blended some more of the same colour around the edges of the card...


6) Finally I stamped and die cut one of the butterflies using the same colour and stamped out a sentiment also using chipped Sapphire and adhered them to the card...


Here are the products that I used:


Thank you for looking and happy crafting!
Jane xx