Saturday 26 August 2017

Watering the Wildflowers for Bee Crafty

Hello!

This week I am back at Buzzy Goings on at Bee Crafty Blog with a card combining flowers with a bit of Banksy...


The products that I used to make it were...

* Oval Lace - Inkables Stencil
* Girl Watering Aerial - Inspired by Banksy Stamp
* Ink splat 1 - Backdrops Stamp
* Wildflowers 3 - Beautanicals Stamp
* Everyday Sentiments 1 - Wordage Stamp
* Distress Inkpads - Dusty Concord, Broken China and Crushed Olive
* Versafine Inkpad - Onyx Black
* Clear Embossing Powder

 
Here is how I made the card...
 
1) I started by inking 2 pieces of card measuring 2 1/2" x 4" and 4 3/4" x 4 3/4".  I used ink duster brushes to add the 3 distress inks across the pieces of card, blending them between colours.
2) Next I used the Oval Lace stencil by placing it on the pieces of card and spraying water onto it.  After allowing it to settle for a few seconds I then used kitchen roll to lift some of the ink off for a ghosting effect.
3) On the smaller piece of card I added some of the ink splats using the same distress inks but taking the first generation of ink off on scrap paper first.
4) On the larger piece of card I added the wildflowers stamp using the same technique.
5) The girl was then stamped with Versafine and clear embossing powder heated over the top onto the smaller card piece.
6) Both pieces were then matted onto black card and when I knew where the girl would be placed I stamped the sentiment onto the card.
7) Using the same stencil and distress inks I then added some decoration to two corners of a 6" square card before adding the other card layers.  The girl was raised using foam pads for extra dimension.
 

Thank you for taking a look and I hope you have a lovely weekend, especially if you are able to enjoy the bank holiday.

Happy crafting,

Jane xx

Saturday 19 August 2017

A Trio of Butterflies for Bee Crafty

Hello!

I am back again with another project for the Buzzy Goings on at Bee Crafty Blog. 

This week I decided to use distress oxide ink pads as these are a recently acquired medium for me as well as some new stamps that I got in the recent Bee Crafty summer sale (I can't resist a stampy bargain!) :)

Here is the 6" x 6" card that I made...


The products used were...

Large Butterfly - Art Stamp
* Script XL - Backdrops Stamp
* Everyday Sentiments 1 - Wordage Stamp
* Distress Oxide Inkpads - Wilted Violet, Faded Jeans, Cracked Pistachio
* Versafine Inkpad - Onyx Black
* Clear Embossing Powder

I wanted to see how versatile the oxide inks are so used them in 3 different ways for this card.

1) First I created the background by smooshing (technical term) the ink pads onto my craft mat, spritzing with water then placing watercolour card into it.  I dried this layer off before adding extra dabs of the other colours using the same technique, making sure each layer was dry before adding the next.
2) Using the same 3 ink pads I inked up the script background in patches and then stamped right across the background.  I kept a spare piece of the background without stamping ready for the sentiment.
3) The big butterfly was stamped 3 times using the Versafine and then heat embossed with clear powder.  The sentiment was created the same way but stamped onto the spare piece of the original inky background.
4) Once the butterflies were cut out I coloured them using the oxide inks from a mat and a water brush.
5) I decided to add a few mats and layers to create a frame for the background, then added the sentiment and butterflies using foam pads and 3D glue gel.


This was quite a quick card to make, but the oxide inks create really fab backgrounds very easily, and with the beautiful stamps made this card very easy to create.

Thank you for reading and happy crafting!

Jane xx

Saturday 12 August 2017

Butterfly Blues for Bee Crafty

Hello!

Today it is my turn to share a design team project with you at Buzzy Goings On at Bee Crafty Blog and I decided this week to use some MDF...


To create this piece I used the following products...

* MDF Art Board
* Teasels - Beautanicals Stamp
* Wildflower 2 - Beautanicals Stamp
* Everyday Sentiments 1 - Wordage Stamp
* Butterflies Set 1 - Winged Things Stamp
* Regular Dots - D'Inkables
* White Gesso
* Crackle Paint
* Acrylic Paint (Blue and White)
* Gilding Wax - Silver
* Embossing Powder - Silver and White
* Permanent Ink - Blue
* Heat Resistant Acetate
* Spray Inks

This is how it was made...

1) Stick the MDF plaque to the base and coat with white gesso to prepare the surface.
2) Paint the whole plaque using crackle paint tinted with some blue acrylic paint.


3) Once the crackle has been allowed to dry naturally put on some stencilling with white paint and the regular dots d'inkable.  Add some stamping using the distressed diamonds and permanent blue ink.
4) Add some darker blue paint and gilding wax around the edges to help frame the piece.
5) After using an anti static bag, use clear embossing ink and silver powder to heat emboss the wildflowers directly onto the MDF.
6) To create extra depth and layers, stamp the teasels onto heat resistant acetate using white embossing powder and cut it to size.
7) To soften the white embossing to blend it into the plaque more, add a small amount of blue permanent ink to the teasels, then put glue onto the places where it will not be seen from the front to add the acetate to the plaque.
8) On a piece of water colour card spray a selection of blue and purple inks and once dry add some more stencilling with white paint.
9) On this coloured card stamp 3 butterflies using clear ink and white embossing powder.  Then cut out and add to the plaque.
10) Stamp the sentiment onto card and mat onto the same card before adding as a final touch.


Thank you for reading, I will be back next week with another project.  Happy crafting,

Jane xx

Saturday 5 August 2017

Up, up and away for Bee Crafty

Hello,

Thank you for stopping by to have a look at my latest DT project for Buzzy Goings on at Bee Crafty Blog.  Here is the card that I made...


To make this card I used...

* Distressed Harlequin D'inkable
* Regular Dots D'inkable
* Laugh, Live, Dream - Wordage Stamp
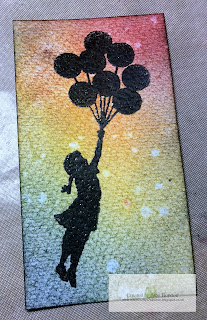
* Balloon Girl - Inspired by Banksy Stamp
* Decision to Try - Wordage Stamp
* Distress Ink - Festive Berries, Mustard Seed, Broken China, Black Soot
* Versafine Black Ink
* Clear Embossing Powder

I started by using the broken china, festive berries and mustard seed distress inks on watercolour cardstock.  I blended the colours using an ink blending brush to create extra shades where they crossed. 
Water was then splashed onto the card and lifted with kitchen towel to create lighter spots.  The distressed harlequin d'inkable was then used with the same distress inks, some of the inks got a bit mixed so created different colours with the stencilling.
To add a bit more drama I then used black soot distress ink with the regular dots d'inkable and then added extra ink around the edge of the card to help frame it...


Using the 'Laugh, Live, Dream' stamp, I added some stamping with black ink to create another layer to the background...


I then repeated the same colours on a smaller piece of card and again added the water splashes.  Making sure this was totally dry I then stamped the balloon girl with Versafine and put clear embossing powder over the top...


Both pieces were then mounted onto black card and added to a 6" card blank.

Finally the 'Decision to Try' stamp was stamped in black and clear embossed as well, then cut up into sections to add to the card.  I decided to leave these white to stand out against the background.

I hope you have a lovely rest of the weekend and happy crafting!

Jane xx

Friday 4 August 2017

Creative Artiste: A Vintage Romance

Hello!

Today I am posting my latest design team project for the Creative Artiste Challenge Blog...

 
To take a look at all the design team projects, have a read of the rules and enter your fab projects, you can click HERE.
 
This month the fantastic sponsor of the challenge prize is Maja Design...


Last year I was fortunate enough to win some of the fabulous papers from Maja Design, so I had to use them for my project...


Starting with a greyboard tag from Tando Creative I used Decoart matt medium to stick on some of the paper from the Vintage Romance collection.

After sanding around the edges, to fit it exactly, I added some tea dye distress ink to the outside and some champagne sparkle paste by Imagination Crafts through a Scrapmatts crackle stencil across the main part of the tag.

To add even more interest to the background I used my Indigo Blu dinkie script stamp and then cut off part of a snipart chipboard mandala which was painted with diamond coloured starlight paint before adding a touch of gilding wax and attaching to the tag...


I cut out the mirror and mannequin from another sheet of paper to layer up at the bottom of the tag, using glue gel to give it some dimension.

The tag was then finished off with a selection of paper flowers from my crafty stash, with gilding wax added to the edges of the petals.  The sentiments came from the Lost and Found collection by 7 Dots Studio.

To tie everything together I completed the project by spraying on some Prima Bloom tea dye ink spray...


The Maja Designs paper is so beautiful and very good quality, so do please enter your projects for a chance to win some!

I will be back tomorrow with my weekly Bee Crafty post, hope to see you then!

Jane x

Tuesday 1 August 2017

Altered Eclectics: A 'Sweet' Project!

Hello!

Welcome to a new month which means a new challenge over at Altered Eclectics!
If you would like to have a look at all the design team inspiration or have a read through the challenge rules please click HERE.

My design team project this month is on a very small scale for me.  One of my children had some candy sticks as part of a party bag (actually they didn't like so them so I had to eat them!) and I thought that the box was so cute I would like to try a bit of altering and mixed media with it...
 
Before...


After...
 

I used white gesso from Decoart to cover the box to start with (it took a few coats as the colour of the original box was quite dark), then I used texture paste through a Scrapmatts hexagon stencil.  Some chipboard was added along with metal embellishments.

The hexagons made me think of honeycomb and bees so I added a metal one that I had in my stash and also thought that the micro beads and art balls could be pollen!
It was all painted with Decoart fluid acrylics then finished off with gilding wax.

The flower was added to break up some of the orange colour and the 'happy' (again from Scrapmatts) was intended to finish off the idea of 'Bee Happy'.

I hope that we will see some of your projects this month over at the challenge, until next time 'bee happy' crafting!

Jane x