Saturday 30 September 2017

Unfinished Art for Bee Crafty

Hello!

I am really excited to be posting my project today on the Buzzy Goings on at Bee Crafty Blog as it is also the day that Bee Crafty are on HOCHANDA (10am and 3pm) with their gorgeous Da Vinci stamps!

When choosing which of my design team projects to share today there was no contest.  I love working with MDF as it allows me to use so much texture and lots of different mediums so I had to choose this mixed media piece incorporating my favourite of the stamps (the wings!) plus two pieces of MDF...


To create this project I used...
 
* Art Is Never Finished - Inspired by Da Vinci
 
I started by creating the background on both pieces of MDF.  They were first primed with gesso then texture paste applied.  I initially attempted to stamp into the paste with the XL Script stamp.  This didn't really work as I think the paste was too thick and the design too detailed, but it did create a great texture which I really liked, and where the paste was thinner you could see some elements of the script.  I then used the paste through the diamond D'inkable for even more background texture...
 
 
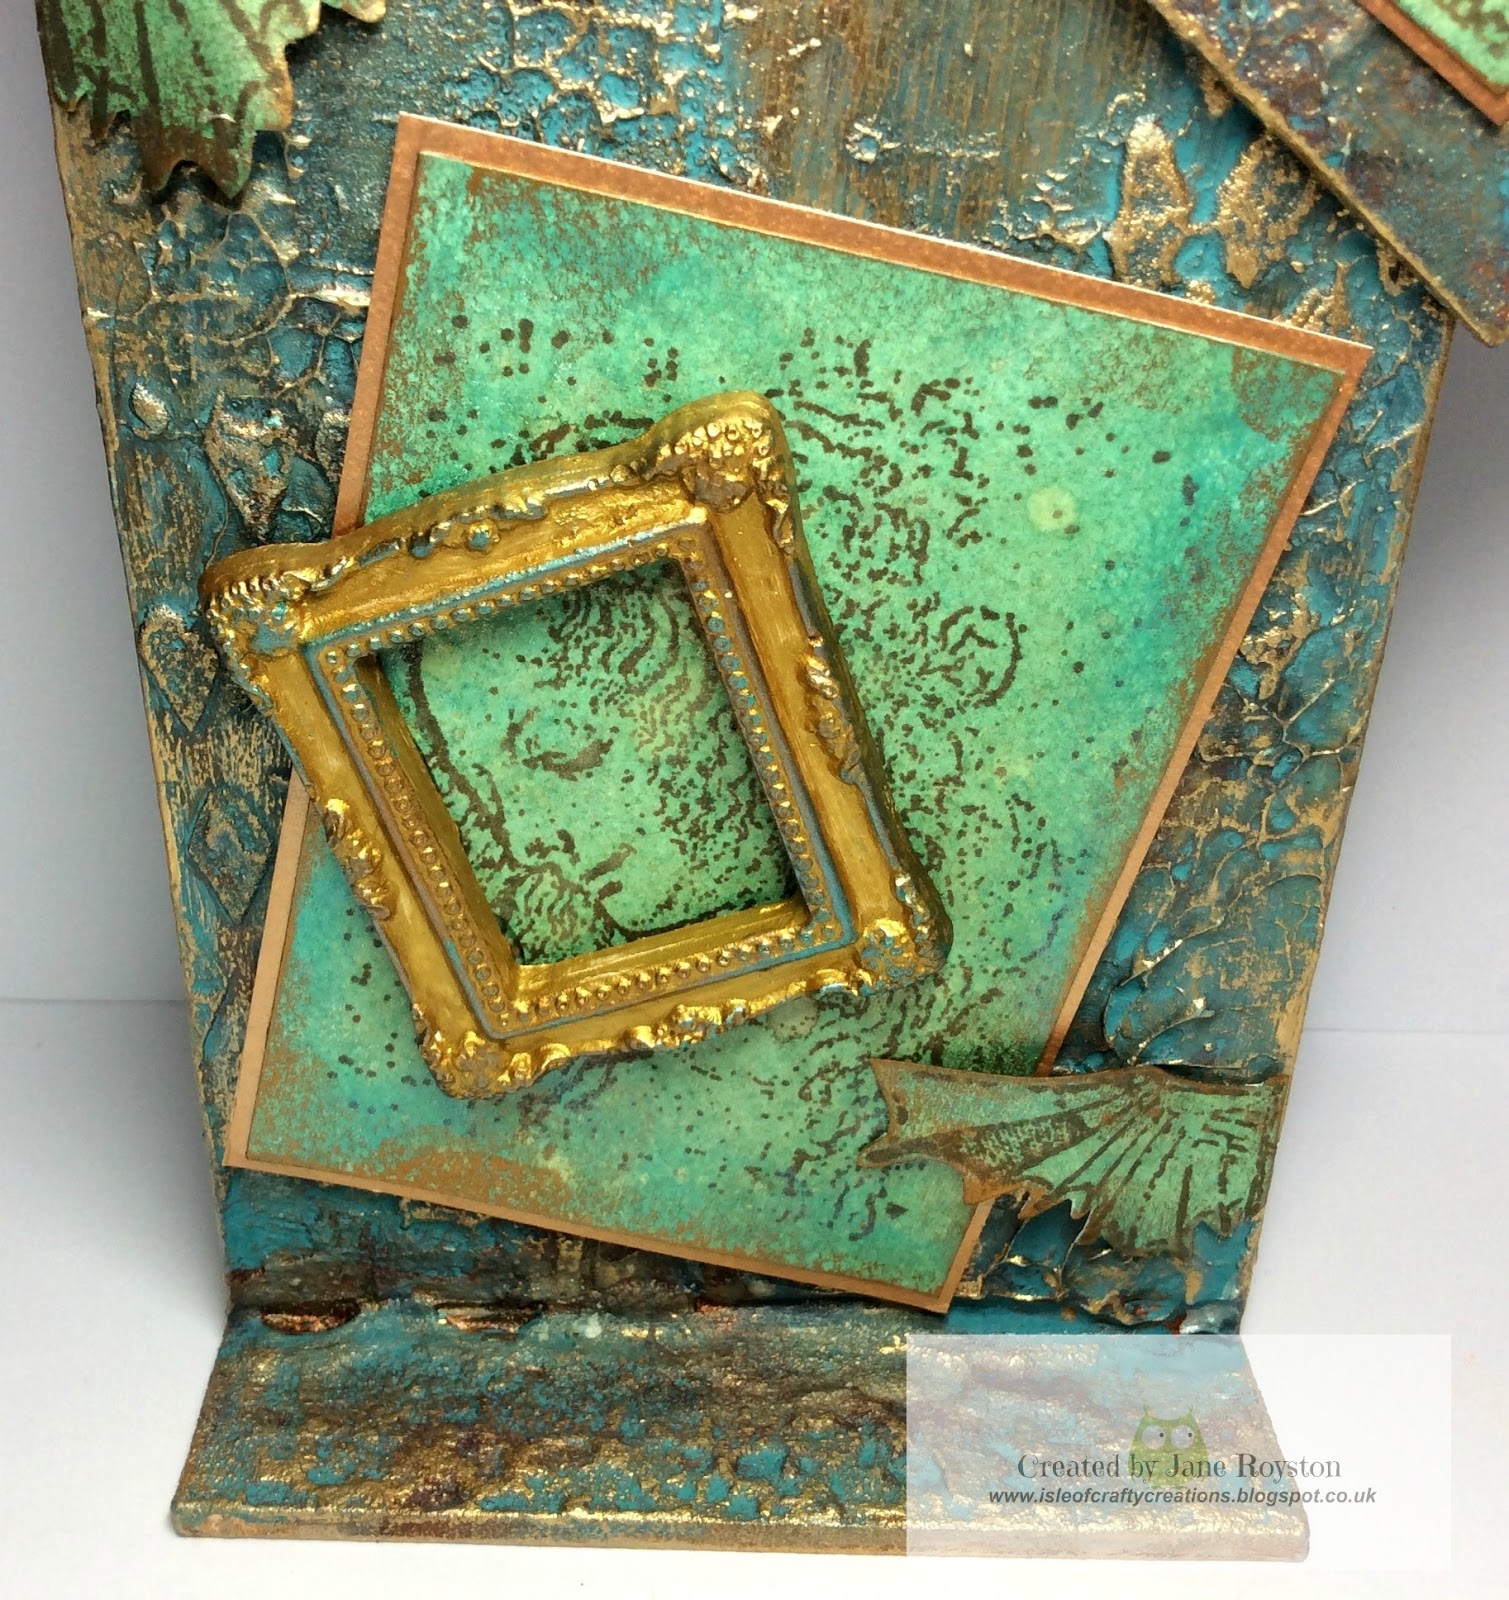
I painted it all with brown acrylic paint and next used patina antiquing cream over the top which was  rubbed back after drying with a wrung out baby wipe.  Gold gilding wax was added to create highlights on the texture.
To create the background for the stamps I chose cracked pistachio and walnut stain distress oxides and coloured a piece of card.  The wings, portrait and sentiment were all stamped with sepia archival ink, a touch of gilding wax added to the edges and the pieces then matted onto gold card.  These were added to the MDF with glue gel for extra dimension...
 
 
I like to use moulds and resin so to continue the art theme I coloured one of my resin frames using gold paint and a bit of patina gilding wax and added it to highlight the face of the portrait.
 
The smaller tag was stuck to the main piece then when dry I added some rusty wire through both holes and coiled the pieces at the top.
 
Hopefully you will be able to catch the shows today, or if not they should be available on the website on rewind for a couple of weeks, I will certainly be watching!
 
Thank you for reading, happy crafting,
 
Jane xx


Tuesday 26 September 2017

A Fragile Heart for Tando Creative

Hello!

This week over at the Tando Creative blog it is crackle medium week!! One of my favourite types of product I have so many different varieties in my crafty stash :)  For my design team project I decided to go for quite a subtle crackle look which is why I have included some close up photos in my post...


At the moment I seem to have a bit of a love of wings, so I decided to create a winged heart using the heart shape from the Industrial Wings kit plus one of the larger wing sets.

I started with the background on the tag using the Industrial Elements stencil and texture paste, then created a pitted and rusted metal effect using paint and salt (as demoed by Andy Skinner).
On the wings and cog I used the Decoart crackle paint which gives a lovely egg shell type crackle effect, then used the patina antiquing cream and finally a wash of quinacridone gold to age it even more...


As I wanted slightly bigger cracks on the heart I used the crackle paste, which was also painted then antiquing cream added.
I was lucky enough to attend one of the days at Di's Tando retreat in August so used some of the circle grid that I had left and dipped it in watered down Prussian blue hue, as we had learnt in the workshop, for a bit of background detail.  Then the little nuts and bolts from the Industrial Elements set were made to look like rusty metal using Decoart paints and gilding wax...


Finally the main finishing touch was the sentiment from the Handle with Care stamp set, and to add a different sort of crackle that did not require any medium I used the crackle stamp from Bee Crafty...


Touches of gilding wax were then added and finally I punched extra holes into my grey board tag to create a rusty wire hanger!

These are some of the products I used, you can click on the links to see more details...

* Greyboard Tag Size 9 (Tando)
* Wings Set (Tando)
* Industrial Wings Kit (Tando)
* Industrial Elements Kit (Tando)
* Grid Round (Tando)
* Industrial Elements Stencil (Andy Skinner)
* Handle With Care Stamp Set (Andy Skinner)
* Decoart Crackle Paint
* Decoart Crackle Paste
* Decoart Fluid Acrylics

Thank you for taking the time to look at my project and post, it is much appreciated :)

I would also like to enter my project into the following challenges...

* CountryView Challenges - Metal
* Craft Stamper, Make It, Take It - Anything Goes
* Mixed Media World - Anything Goes
* That's Crafty Challenges - Fly Away
* Sandee and Amelie's Steampunk Challenge - Anything Goes (Steampunk/Industrial)

Happy crafting and crackling!

Jane xx


Saturday 23 September 2017

Autumn Tag for Bee Crafty

Hello!

As the weather is turning much more autumnal now I thought that this week for my design team blog post at Buzzy Goings on at Bee Crafty Blog I would share one of the recent makes for the HOCHANDA shows that has a very autumnal feel...


The products used were...

* MDF Tags
* Birds and Butterflies Set 1 - Art Stamps
* Birds on a Wire - Art Stamps
* Moon - Art Stamps
* Ticker Tape Sentiments - Wordage Stamps
* Regular Dots - D'Inkables Stencil
* Maple Leaf - Inkables Template
* Distress Oxide Inkpads


My main aim with this tag (as well as to show the stamps) was to show the variety of ways that stencils can be used.  I started by using the stencil to put texture paste onto the MDF before painting it over and highlighting with gilding wax.  I then used the stencil to stipple paint through and finally I used the stencil as a template to draw around and cut out the leaves (these were then coloured using the distress oxide inks).
The tag was painted using a shimmery acrylic paint in autumnal colours and the birds and moon were stamped using versamark and then heat embossed.
To add extra interest to the background the d'inkables are ideal and on this one I used the regular dots with paint.


As well as the leaves I also wanted the beautiful bird to be a main feature.  I stamped and then clear embossed the bird before cutting it out.  Next I used alcohol markers to create some colour, choosing more autumn tones, before using glue gel to create dimension.

I hope you are enjoying the changing of the seasons.

Happy crafting,

Jane xx

Saturday 16 September 2017

A Kaleidoscope of Butterflies for Bee Crafty

Hello!

Once again it is my turn to share a project on the Buzzy Goings on at Bee Crafty Blog and this week I have chosen my favourite design team sample from last weeks HOCHANDA shows...


There may be a bit of a pattern emerging with my posts in that it is becoming very obvious that I love butterflies!!  Here are the products that I used...

* Circle MDF Art Board
* Moon - Art Stamp
* Birds and Butterflies - Art Stamps
* Wildflower 2  - Beautanicals Stamp
* Ticker Tape Sentiments - Wordage Stamps
* Regular Dots - D'Inkables Stencil
* Acrylic Paint
* Crackle Paint
* White Embossing Powder
* Silver Gilding Wax


1) After priming the art board with gesso I put texture paste through the regular dots stencil, then added some blue acrylic paint to crackle paint and painted the whole piece.
2) Once dry I stamped on the moon and wildflowers using versamark ink then heat embossed with white powder.
3) To highlight the stencilling I added some silver gilding wax.
4) Then the time consuming part!! I stamped lots of the 3 smallest butterflies in black Versafine ink and clear embossed with powder over the top.
5) After cutting them out I coloured them using different shades of blue alcohol markers and then used clear sparkle pen to add a gentle shimmer.


6) I planned out where I wanted the butterflies to be, then attached them using glue gel.
7) I chose the sentiment I wanted from the ticker tape set and stamped using versamark onto black card, then heat embossed again in white.
8) I cut the words and phrases out then placed them where I wanted them to go.


I hope you were able to catch the shows last week.  If not they do remain on the HOCHANDA website to rewind for about 2 weeks so there is still time to watch them!

Have a lovely weekend and happy crafting!

Jane xx

Tuesday 12 September 2017

Shadow Frame for Tando Creative

Hello!

I can now announce that I have been lucky enough to have been chosen as a new member of the design team for Tando Creative!  This means I will be making samples for their TV shows as well as making regular posts of my projects to the Tando Creative Blog.

Today is my first post as part of the team and this week the theme is Glossy or Shiny so I decided to use a bit of both...


I started by coating the shadow frame pieces with white gesso then the smaller bits with tinting base.
The background of the frame was made using a baby wipe with cobalt teal hue, hansa yellow light and cadmium red hue, blending the colours together with the wipe.  To make my first glossy area I squished a versamark ink pad through the distress harlequin mini stencil and heat embossed with clear powder...


The outside frame was painted with the red acrylic and then stamped with the other two colours using the Nathalie Kalbach 'Marks' stamp set from Stampendous.  To add contrast and some more glossiness I then stamped with black versamark ink and heated clear embossing powder over the top.
Once the frame pieces were stuck together I added shine using a pearl gilding wax.
The mini flowers were painted using hansa yellow light, diarylide yellow, pyrole orange and cadmium red hue and the mini leaves with green gold and yellow green light.  To help it stand out I used cobalt teal hue for the butterfly. Once the pieces were dry the marks stamp set was used with archival black ink to add extra pattern and then glossy accents applied and left to dry overnight.
I thought the word 'Reflect' would go well with the glossy theme so painted it in carbon black then coated the word with glossy accents.  While this was still wet I added a sprinkle of glamour dust (crystal) to make it shine as well...
 
 
Once these had all dried thoroughly overnight the finishing shiny touch was some gems for the flowers and butterfly and then it was all ready to be attached.
 
The products used were...


http://www.tando-creative.co.uk/catalog/shadow-frames-p-1406.html
 
Thank you for taking time out to read my post!
 
Happy crafting,
 
Jane xx
 

Saturday 9 September 2017

Life is a Colourful Canvas for Bee Crafty

Hello!

Well after all the spooky goings on in last week's post I decided to go for a bit of colour this time on the Buzzy Goings on at Bee Crafty Blog...


To make this card I used the following products...

* Life is a canvas - Wordage Stamp
* Script - Backdrop Stamp
* Ink splat 1 - Backdrop Stamp
* Ink splat 3 - Backdrop Stamp
* Spray Can - Inspired by Banksy Stamp
* Splatter Swirl - Backdrop Border Stamp
* Brick Wall with Hole - Inkables Stencil
* Distress Oxide Inks - Worn Lipstick, Fossilized Amber, Broken China, Faded Jeans
* Versafine Black Onyx Inkpad
* Silver Acrylic Paint Pen


Here is how I made the card...

1) I started by creating the background with the worn lipstick, fossilized amber and broken china distress oxides.  The pads were squished onto a mat then water added and the card smooshed in it.  I dried with a heat tool between layers and kept adding the colours until I was happy.
2) Using the same inks I added the two different ink splat stamps randomly across the card.
3) The stencil was placed into the corners and I used a baby wipe to remove part of the colour, then in other areas added extra distress oxide ink through the stencil.
4) I splashed some water across the card and then dabbed off with kitchen roll to add lighter spots.
5) The border stamp was stamped all the way round the edges with the broken china distress oxide ink pad.
6) Then I used faded jeans distress oxide to add a little bit of the script stamp to some of the corners.
7) I stamped the spray can onto another piece of card with the faded jeans oxide and embossed with clear powder.  Next I used a silver acrylic pen to colour the plain areas that were left.  The same pen was then used to splatter some silver ink across parts of the card.
8) The sentiment was stamped onto a piece of card and clear embossed before dusting some of the distress oxides on with an ink duster brush.
9) The card was then mat and layered and the sentiment and can were raised slightly using foam pads.


 My main aim with this card was to create a layered background using stamps and stencils, and also to use the distress oxides in a few different ways.

Thank you for taking the time to have a look, happy crafting,

Jane xx

Saturday 2 September 2017

Spooky Samples for Bee Crafty

Hello!

Over on the Buzzy Goings on at Bee Crafty Blog I am back this week to share with you my design team samples from yesterday's Bee Crafty shows on HOCHANDA.  What fab shows they were and it was great seeing the wide variety from the design team plus the fantastic demos from Bev.

For my samples I used the following products...

* Skull Background - All Hallows Stamp
* Skull and Raven - All Hallows Stamp
* Skull - All Hallows Stamp
* Poison Bottle - All Hallows Stamp
* Big Eared Bat - All Hallows Stamp
* Trick or Treat - All Hallows Stamp
* Happy Halloween - All Hallows Stamp
* Danger Poison - All Hallows Stamp
* Metal Alpha - Inkables Stencil
* Regular Dots - D'inkables Stencil
* MDF Landscape Art Board
* MDF Tag
* MDF Victorian Standing Tag
* Distress Oxide Ink Pads - Wilted Violet, Fossilised Amber, Cracked Pistachio


With this art board I used the metal alpha stencil in the background with modelling paste then created a pitted, rusty metal effect using a salt technique.


I really wanted to create an aperture card with a dangly skull so the middle was cut out with a circle die and I added a piece of card across the bottom of the card to make it more stable.


For the background of the tag I used the dot stencil but also the bottom part of the skull stamp for extra texture.


Distress oxides were used to create the main background as well as the card for stamping the other parts onto to cut out.


The skull background is stamped and embossed onto the tag but might not be easily seen beneath the bats!  The bottle was stamped onto acetate to make it more realistic.


The easel base was created using an oval die and the skull is also stamped onto the background of the card in antique linen distress ink, but did not show up as much in the photo.

Thank you for taking the time to look, I hope you have a great weekend and happy crafting.

Jane xx

Friday 1 September 2017

Creative Artiste: A Hopeful Heart

Hello!

I am back for a second post today because as well as being the first of September it is also the first Friday of the month!

That means that there is also a new challenge over at the Creative Artiste Challenge blog, click HERE for the link.


This month the fabulous sponsor for the challenge is...

http://papertoleaustralia.com/

Here is my design team contribution for this month...


I have used the Scrapmatts bubble stencil in the background and on the board I have used some of their chipboard pieces (hexagon mesh, oval ornate frame, chain, circle and also the little flowers).

I started by working on a large mixed media board from Tando Creative.  The stencil was used first with modelling paste and then once dried I used Decoart media line paints along with some salt to create a pitted rusty metal look that Andy Skinner uses and teaches.

I wanted all the pieces to look old in different ways so used Decoart crackle paint and patina antiquing cream on the wing, word and cog (all from Tando Creative) with a wash of paint for the rust...


I used the same pitted technique for the heart, oval frame and large cog that I had used on the background.  Then created a rusty colour using quinacridone gold on the other pieces...


Once all the pieces were glued down and dry gold micro beads were added to areas and then some metal and glass embellishments to co ordinate with the colours used.

To match the word 'Hope' I decided to use a stamp from Visible Image with the definition of dream and used some distress ink to age the card...


I really enjoyed using lots of techniques on this project and hope that you liked it too!

Do please go over to the Creative Artiste challenge for a look at the other projects from the design team and we would love to see lots of you entering your mixed media pieces this month.

I am also entering my project into the following challenges...

* Frilly and Funky - A Little Rusty
* Mixed Media World - Anything Mixed Media Goes
* Sandee and Amelie's Steampunk Challenge  - Anything Goes (Steampunk/Industrial)
* That's Crafty - Rustica

Thank you for looking,

Jane x

Altered Eclectics: Time Flies

Hello!

The first day of September is here which means it is almost back to school time, but a few more days to enjoy first!

It also means it is the start of a new challenge over at the Altered Eclectics Challenge Blog and you can click HERE for the link.

With this challenge you can enter any type of altered or mixed media project as long as it is not a card or ATC, and the theme is always anything goes.

Here is my mixed media canvas that I made for the challenge design team...


I have a bit of a thing about wings at the moment, especially when combined with clocks and hearts, so I ordered a mould from Arty Co of steampunk angel wings, so that I could make my own wings whenever I wanted.
The wings and the clock (Prima IOD mould) were cast with quick drying white resin and the frame underneath was from a Craft Box by Anna Hersom.

Once I had my main feature planned I added lace and stencilling to the canvas with matt medium then once these were dry added my embellishments using extra heavy body gel...


I used a selection of items from Craft Box and others that were in my crafty stash, as well as art balls from Powertex (these were ideal for filling in any gaps or areas with too much gel medium!).

Once these had fully dried overnight the whole piece was painted with black gesso.  I used a couple of coats to make sure that everything was totally covered!!

Then I used Lindy's Stamp Gang sprays to add colour (time travel teal, rusty lantern and gator gumbo olive).

Next to highlight the textures I used gold gilding wax from Pebeo.


To add a bit of sparkle micro beads were added to some 3D gel medium as well as some teal glitter using soft gel medium.  Next some larger beads and gems were added to create a bit of contrast with the darker background.

The final touch had to be a sentiment, and this one from Bee Crafty Stamps was perfect for the theme.


It was quite a weighty piece at the end of this!

I hope you enjoyed my post and it has maybe inspired you to have a go at the challenge, do please pop over for a look and also to see what the other design team members have made.

Jane x