Wednesday, 30 November 2016

Hegdehog Delight!

Hello!

I have recently been very lucky to have been given some brand new stamps to try out some projects with :)
The stamps are from LC Designs (Little Claire) who are a lovely company making clear stamps plus a range of card/paper accessories.  I have, over the years, bought stamps from the company when I have seen them at various craft shows so I was really excited to have a play with these!

This new stamp set has an outline hedgehog that can have words added to it, plus there are some other elements on the set as well.

Here are a couple of cards that I made using the set...

 
For this card I cut out the stamped leaves and coloured them before coating in glossy accents. The hedgehog image was stamped then the word added and for this card I decided to add my own prickles! 


On this card I decided to use the tree trunk element from the stamp set along with the hedgehog, this time the word become the prickles!  I wanted a printed look so coloured the image using Spectrum Noir Illustrator alcohol pens.

Here is an idea of some of the other elements on the set...


To see more the website for LC Designs is... http://www.mylcdesigns.co.uk/

To get up to date info about events and products, plus inspiration their blog is...
http://littleclairesdesigns.blogspot.co.uk/

I will be back tomorrow with my project post for the Altered Eclectics Challenge blog, so I hope you will come by to see what mixed media I have been up to!

Jane x

Monday, 28 November 2016

A Little Bit of Fantasy...

Hello!

I have been very lax with my posts again and also realised that I hadn't shared some samples that I made for the Hunkydory Twilight Collection launch a couple of weeks ago.  So I thought I would share my creations with you today, especially as the stamps sold out so quickly when the shows were aired so I don't think the design team samples got much chance to be seen!

This collection is based around fantasy and fairy tales and the kit itself had lots of black silhouette images against quite dramatic colours, so with my samples I tried to show how the stamps could create some different looks...


Have a lovely start to the week,

Jane x


Saturday, 19 November 2016

Decorative Boxes

Hello again!

Three days of posts in a row, must be a near record!!

Today I have some of the samples that I created for the Weekend Wow over on HOCHANDA at the moment.  The beautiful and intricate dies are fab for a range of projects and I decided to use two of them to decorate different styles of boxes...


This first box was created using a tutorial on You Tube by Lea Denton who is a Stampin'Up! demonstrator, here is the link to the video...
 
I used 12 x 12 coredinations card for the main part of the box and cut the Fancy Shutter die out of coredinations green card backed onto stick it.  Once cut this was then mounted onto gold foil card and the box all put together.  Finally I stamped and embossed the sentiment which was from one of the Sentimentals sets by Crafter's Companion and some luxury ribbon was added as per the tutorial.
 
 
My second box was a simpler and flatter box that I made using the box base and lid measurements on my Big Score board.  I used the Butterfly Swirls die and cut it twice to create an oval shape.  By cutting the die a couple more times I was also able to snip away some of the whole butterflies to layer up onto the main die cut.  Gilding wax was added to highlight the texture and organza ribbon and a sentiment added as the finishing touches.
 
To see the dies in action and lots more samples from the whole design team you can tune in as follows...
 
 
Hopefully I will keep my posts more up to date now and hope to see you soon,
 
Jane x


Friday, 18 November 2016

Hearts and Flowers

Hello!

I hope you had a chance to catch some of Leonie's shows yesterday, I really enjoyed seeing the demos and also the samples, including some by the new design team members!

Today I thought I would show a couple of new cards that I made using the entwined heart dies in combination with some of the floral stamps that were also on the shows...

 
This card was created using the Big Heart (Floral Cascade) along with the butterfly from the Folk Heart base.  I kept the inside of the heart that had been die cut and coloured it using gilding wax to create a contrast when the elements were put back together.  The Beautiful Blooms stamps were used in the background as well as then stamped, cut out and shaped for the focal elements.  Finally the sentiment came from the message ribbons stamps.
 
 
For this card I wanted to use a different colour scheme from purple or pink so went for blues.  The background was created using the Dizzy Daisy stamp set and coloured using Spectrum Illustrator pens, with Broken China distress ink blended around the edges.  I also watered down some gold paint to flick onto the background for extra detail.  The Folk hearts were used to create a solid and detailed heart in coordinating colours and finally some of the message ribbon stamps used again for that finishing touch of a sentiment.
 
Starting today on HOCHANDA is also the Weekend Wow from Crafter's Companion for which I have also made some design team samples!!  There are lovely dies that are great for creating really elegant cards, boxes and lots more and I will put some of my projects on here tomorrow as well.
 
I hope you have a good end to your week and are looking forward to the weekend, hopefully I will see you back again soon,
 
Jane x 


Thursday, 17 November 2016

A bit of mixed media dies and stamps...

Hello!

Firstly I must apologise for my lack of posts, I have been very busy though crafting for the design teams ad also preparing for a couple of Christmas craft fairs so my blog went a bit by the wayside :(

However I am back today to show you some of the new samples that I made for Leonie Pujol's One Day Special that started last night and continues today at 9am, 12pm, 4pm and 7pm.  It is some of the previously released stamps and dies but at fantastic prices!!
Here are a couple of the samples that I made with a selection of the Mixed Media stamps and dies...

 
I really love the flower dies as I am always putting die cut flowers on projects but these are that bit different having a more funky and fantasy feel!  I decided to really go full on for this card and wanted it to be bright and sparkly.  The background was created by stamping the flowers and then heat embossing with clear powder.  Then I added Leonie's sparkle pens, blending them together at the joins before adding some of the text stamps in black to really stand out.  The die cut flowers were also coloured using the sparkle pens before being stacked up then a sentiment added.
 
 
For this card I wanted to create something a bit different so only used the lips from the die set.  Each set of lips was coloured using Spectrum Illustrator pens then coated with glossy accents.  The background was created using Aqua Markers on the mixed media texture stamps and then finally one of the word ribbons was used around the edge.
 
These were great fun to make and I will be back tomorrow with a couple of the new samples I made using the entwined heart dies.
 
A quick reminder that when I reach 50 followers I will be having a giveaway of some crafty goodies, including some of the dies that are on the shows today, so if you are not already a follower I would be really pleased if you would click on the button over on the left hand side :)  Here is the prize I will be giving away from a special post...


I hope you have a lovely day,
 
Jane x 


Monday, 7 November 2016

For the Love of Stamps...

Hello!

As promised I am back with a few more of the samples that I made as part of the Hunkydory 'For the Love of Stamps' design team...


This first project was created using the 'Tons of Fun' stamp set.  I wanted to create something a bit different so used a project from the Big Score board project CD and my score board with centura pearl to create this gift card holder.  I loved those elephants and wanted to show their cuteness in quite a simple way so just coloured and cut them out in different combinations before sticking them onto the various pages.


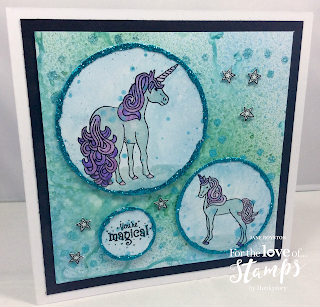
This next card was to showcase the 'Unicorn Dreams' stamp set but I wanted to do a bit of a different colour scheme.  The background was created using spray inks then the unicorns were stamped, coloured and die cut along with one of the sentiments before having glitter added around the edges for that extra magical sparkle!

 
Finally I have a stepper card made with the 'It's Wine O'Clock' set.  For the pictures I used gilding flakes and for the sentiments gold embossing powder as I wanted to make an elegant black and gold card that would be ideal for many celebrations such as anniversaries or birthdays.
 
I loved working with these stamp sets and they stamped out really well with a variety of mediums and techniques.  If you didn't get a chance to catch the shows at the weekend I am sure that they remain for a period of time on the Create and Craft website so do take a look for more ideas if you like the stamps.
 
Thank you for coming by and I hope you will come back again soon,
 
Jane x 

Saturday, 5 November 2016

For The Love of Stamps: New Launch!

Hello!

Well today's the day that Hunkydory launch a new collection of clear stamps to their range on Create and Craft.  The first show is at 10am but you may need to check the schedule for the rest of the weekend as shows are subject to change especially if things are selling out quickly!!

To celebrate the launch I thought I would show you a few of the samples that I made using a selection of the new stamps...


I have to show my most favourite sample first!  This pop up box card was made using the 'Tons of Fun' stamp set.  It is a gorgeous set as the elephants come in a variety of sizes and are simple to cut out.  Brilliant for new baby cards as well as birthday cards up to a variety of ages, I decided to go for a birthday theme on this one and went to town with the elephants!!  I used Spectrum Aqua markers for the colouring with a clear sparkle pen.

 
As always I didn't only want to make cards as to me stamps are a great tool for a wide variety of projects and when I saw the 'It's Wine O'Clock' stamp set I thought immediately that it would be great for decorating a wine gift box!  The box was made using A3 Centura Pearl card, but I used the non shiny side for the outside so that I could stamp and colour easily onto it.  It was created using the Big Score Board from Crafter's Companion and the instructions for the box are on the disk that comes with the board.  I coloured the pictures using Faber Castell Pitt pens and used a selection of stamps from the set to create my decoration.
 
 
As soon as I saw the 'Unicorn Dreams' stamp set I thought it would be lovely as a little plaque to hang in a home!  I used a Tando mixed media board along with acrylic paints and ink sprays for the background.  More sparkle and silver embossing powder were used to try to create a magical look.
 
 
My final sample for today is using the 'Barrow in Bloom' stamp set.  There are lots of lovely elements in this set. great for creating scenes.  I wanted to do a different style of card so looked up templates on the internet one of which was this stepper card.  The background is created using brusho pigment powders and then the elements were coloured and cut out to add to the different panels.
 
I love that these sets all include a few different sentiments on them as it makes them really versatile, and lots of them are not occasion specific making them great for all sorts of projects.
 
I hope you are able to watch the shows today and tomorrow and I will be back on Monday with a few more samples from the shows.
 
If you are off watching fireworks tonight (we are going to a public display) then keep warm and safe and have a great time :)
 
Jane x  


Friday, 4 November 2016

An Autumnal Display for Creative Artiste

 
Hello!
 
It is the first Friday of a new month which means that it is time for a new challenge over at Creative Artiste. 
To take a look at all the fantastic design team projects and to enter your own creation, please click HERE.
This months sponsor for the challenge is Foilplay...
 
 
http://www.foilplay.co.uk/

My project was influenced by the scene that I can see through my patio doors at this time of year.  We live next to a small piece of woodland and at the moment the trees are all sorts of beautiful colours (as well as leaving lots of that colour in our garden!!).  So I decided to make an autumnal plaque using some leaf stamp and dies that were part of the free gifts with Crafter's Inspiration 11...


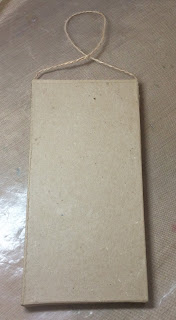
I started with a blank paper mache icon which was base coated with white gesso before adding light paste through an Artplorations stencil (leaf print)...


Once the paste was thoroughly dry I used Decoart paints to colour the plaque (burnt sienna, transparent yellow iron oxide, quinacridone gold, metallic gold)...


Then Decoart crackle glaze was applied in areas across the plaque and allowed to air dry (this is important because many crackle products will not work if heated with a heat tool to dry).  Once it was dry antiquing cream was applied (raw umber) and then the excess wiped back using a piece of damp kitchen roll...


For the flora and fauna I used the leaf stamps and dies from the magazine as well as the daisy and leaf stamps and dies from Heartfelt Creations.  These were all stamped using Archival ink (sepia) and were then coloured using Spectrum Aqua markers (gold, desert, terracotta, burgundy) mixed with the clear sparkle pen.  Some Pebeo gold gilding wax was also added and a Creative Expressions sparkler added to the centre of the flower...


I used the 'Most Beautiful' sentiment from Inkylicious, stamped in archival sepia ink, cut out using  a Justrite vintage labels 2.  The edges were then brushed with tea dye distress ink...
 
 
All the pieces were added to the plaque using glue gel, plus some gold stamens from Anna Marie Designs and some mini pine cones that I bought at a local store...
 
 
Hopefully this will give you a bit of autumn inspiration to enter the challenge, I would love to see you over there!
 
I am back with another post tomorrow as the new set of stamps from Hunkydory 'For the Love of Stamps' will be launching on Create and Craft at 10am.  I will be posting some of my favourite samples that I created as part of the design team and will be tuning in to see Anne Marie demonstrate them, hopefully you will too!
 
Jane x


Tuesday, 1 November 2016

Altered Eclectics: Poppy Plaque

Hello!

It is a new month so it must be time for a new Altered Eclectics Challenge!!
If you would like to go over to have a look at all the other design team projects and for an idea of what you could enter then you can click HERE.  The only rule is no cards or ATC's and it would be lovely to see your entries this month :)

As it is November I thought that I would like to incorporate poppies into my project, here is my finished piece...


I started with a plain paper mache icon, which was then coated with white gesso before applying Finnabair's light paste through a Bee Crafty Damask stencil...


Once this was dried the whole icon was painted using Decoart fluid acrylic paints (Cadmium Red Hue and Transparent Red Oxide)...


Next I used Decoart Crackle Glaze on areas of the plaque and allowed this to totally air dry before adding Decoart Patina Antiquing Cream over the top.  Using some damp kitchen roll I then removed some of the cream, leaving the patina effect in the cracks and around some of the texture.  To add further highlights I also used some Patina gilding wax from Creative Expressions as well as Empire Gold from Pebeo...


Once the background was finished I could create my focal points.  These were to be my poppies which were created using the Blazing Poppy stamps and dies from Heartfelt Creations.  These were stamped using black archival ink...


Memento inks were used with a sponge dauber to colour the flowers (Morocco and Rhubarb Stalk).  I did stamp and cut some leaves but eventually decided to use some flourishes from Crafter's Companion dies in vintage gold card.  The poppies were shaped and stuck together, with some clear sparkle pen and gilding wax added.  To create the centres I used Finnabair black microbeads mixed with 3D matt gel...


The final part of the plaque was a stamped sentiment from Hobbyart (Sunny Day Greetings) which was stamped and heat embossed using gold detail powder then cut out using a Justrite Vintage Labels 3 die, with a brush of distress ink and some more gold gilding wax added to tone it all together...


I love the sentiment and think that it complements the poppies well.

I hope you have enjoyed my step by step today and that you get the chance to take a look at the Altered Eclectics Challenge and maybe even enter.

I also have the exciting news that today one of my projects is being published as part of an online mixed media magazine called 'Mixed Up'.  Here is a little sneak peek of my project plus a glimpse of the magazine cover, there is also a link to the website...

http://www.mixedupmag.com/


Thank you for reading and I hope you will come by again soon!
 
Jane x