Friday, 11 March 2016

Funtastic Friday: 80th Birthday Card

Hello!

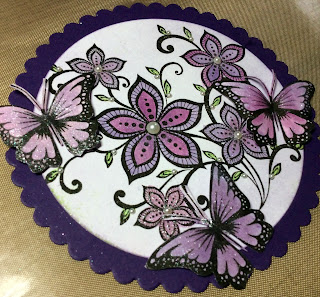
I said on Wednesday that I would be making something more industrial for today's post but I got a bit side tracked making a birthday card for my mum who will be 80 next week, and I decided to post about that instead and save my other project for next week.

I started by choosing a flower and butterfly stamp set by Bee Crafty and stamped the main flower image using black Versafine.  I also stamped out some of the butterflies and cut them out.  Using distress inks and a clear spectrum noir sparkle pen I coloured them in (I used Dusty Concord and Seedless Preserves)...


The main image was cut out with a circle die (with a dusting of ink around the edge) and then mounted onto a scalloped circle cut out in purple card.  Three of the butterflies were then attached using glue gel and faux pearls added...


I used stamp sets from Stampin'Up! for the main sentiment and letters for the banner.  The whole card was then put together on another shade of purple card and extra butterflies and pearls added...


All I need to do now is make the box for it to go in and it is finished!
 
I will be back on Monday, hopefully with that industrial project!!  Have a lovely weekend whatever you are up to.
 
 
Jane x 

Wednesday, 9 March 2016

Wonderful Wednesday - Spring Mannequin: Part 2

Hello again,

I am back with Part 2 of my mannequin story!

I will be entering this project into the following challenges...

* Mixed Media Mojo - Springtime (Watercolours)


* More Mixed Media Challenge - Green
* The Artistic Stamper  - Springtime
* Altered Eclectics - Anything Goes
* Anything But Cute - Crazy For Colour


Here is the photo again of how I had left my mannequin at the end of the last post...


Once the sculpture medium was totally dry it made the material harder and provided a surface that could then be painted etc.

As this was going to be a spring themed project I wanted the background to be green as this is the colour that makes me think of spring, new shoots and leaves appearing.  I painted the dress using 'Refreshing' by American Décor, then added highlights of gilding wax to the areas where there was texture to add definition.  I also at that point decided to 'gild' the black gesso of the mannequin for a more vintage look...


For me Spring meant that I had to use flowers and butterflies (2 of my favourite embellishments for any craft project!!) so next I prepared the paper that I wanted to use for those elements.  I wanted a sunshine feel to my colours so chose to use lemon, scarlet and orange brusho pigment powders.  Instead of using water to dilute them I used the gold foil prima bloom spray for extra sparkle and shine!  I sprinkled the powders randomly onto white card and once sprayed used my heat tool.  One sheet mixed a bit more than I had intended but I was happy with the overall result...


Once this had dried thoroughly I used gold embossing powder with Arianna Blooms from Heartfelt Creations, which were stamped and then die cut.  They were then shaped and stuck together with a gem added to each centre.  The butterflies were from a stamp set by Bee Crafty, and these were also heat embossed then cut out by hand.  I decided to cut off the card antennae and use gold coloured wire on the final project.  These were then put onto the mannequin using glue gel, then some curled wire added for the butterflies and gold stamens added instead of leaves for the flowers...


For the finishing touches I had a look through my bead box and picked some different sized and coloured beads that I felt went with the colour scheme.  These were glued on along with copper micro beads in 3D matte gel.  I have taken a few pictures to try to capture the mannequin from different angles...


I was really pleased with my first use of the sculpture medium and will be up cycling my other mannequin very soon with a long dress!
 
Have a lovely day, and I will be back on Friday with something a bit more industrial,
 
Jane x

Monday, 7 March 2016

Mixed Media Monday - Spring Mannequin: Part 1

Hello and I hope you have all had a lovely weekend.

As it was Mothering Sunday here in the UK I was treated to a lovely meal yesterday evening with my family (my mum liked her poppy album!).  My daytime was spent as a stall holder at a craft fair, but it is one that I go to monthly so I had a lovely day meeting some of my crafting buddies and eating yummy food!!

Today's post is a bit of a prequel as the project I started needed quite a bit of drying time and I did not get as far as I anticipated.

A few years ago I bought some paper mache mannequins from IndigoBlu and although I decorated them at the time I was never really that happy with what I had done.  Now that I have really gotten into my mixed media and have a lot more products available, I decided to redo them!

To start with I removed all the existing parts that could be taken off, removed the mannequin from the dowel and base and then repainted it all with black gesso.  Once it had dried I reconnected the parts and also put some glue gel around the stand where it joined the mannequin to add extra strength...


Then it was time to use a brand new product, sculpture medium from Finnabair.  This liquid can be added onto any porous type medium (fabric, paper etc.) and once dried will make it solid.  This meant that I could add a dress to my mannequin and then make it into a sculpture! 

I started by using an old white sheet that I had and cut off some strips.  I planned what I wanted by placing it around the mannequin before using the sculpture medium so that I was prepared.  I used 3 different pieces to get the effect I wanted plus a piece of lace ribbon that was in my ribbon box.  When I was ready I brushed the medium onto the strip of material, making sure it was well soaked, then placed it on the mannequin.  I may have used more than was needed but I wanted to make sure it worked!  The material went on quite easily and the nice thing is you can add texture by making folds etc...


It takes a while for the liquid to dry depending on the amount you used, I did give it a bit of a blast with my heat tool but then decided to be patient and left it to dry naturally overnight.  The next day the material had gone hard and is now a great base to add colour and other mediums to, which will be part 2...

See you Wednesday,

Jane x

Friday, 4 March 2016

Funtastic Friday - Mum's Poppy Album

Hello and I hope you are looking forward to the weekend!

I have carried on with the floral theme today and am posting a project that I have made for my mum for Mother's Day on Sunday (it's ok she won't be reading this...I hope!).

I am also entering this into the More Mixed Media Challenge - Red.

My mum loves poppies and so there was only really one choice for this project, using the Blazing Poppy Collection from Heartfelt Creations.  I went for an album/journal/notebook as my mum also likes to do art so she could use it for that if she wants to.  This book is bigger than the ones from the other day as it is 6" squared and I put this one together using my cinch binding machine.  Here is how it looked when completed...


The chipboard pieces were covered with paper which had been cut to size then stuck on with mod podge.  Once they had been sealed and dried overnight I edged the sides with gold gilding pen and added some champagne sparkle paste through the TCW reverse chicken wire stencil...

 
The flowers were stamped using black archival ink and then die cut.  As it was a larger space on this book I made 3 poppies of different sizes and also stamped and die cut some leaves.  They were the coloured using memento dye based inks and once they had been shaped and put together they were sprayed with some gold ink, and some also added to the cover.  The centres of the poppies were made using 3D matte gel and black micro beads...

 
Once the flowers had been placed onto the cover I stamped the letters to spell mum and cut them out with a small circle punch.  I used a small banner punch with a contrasting paper from the same collection and edged it with gold gilding pen.  The letters were dusted with ink to match the poppies and then all the pieces stuck together...


I hope she likes it!

I have just had some new sculpture medium arrive today made by Finnabair and can't wait to have a play with it over the weekend, so hopefully on Monday I will have a very mixed media project to show you.

Enjoy your weekend,

Jane x

Wednesday, 2 March 2016

Wonderful Wednesday - Sunflower Notebook

Hello all!

For a bit of a change from the very grungy and steampunk look of the last couple of weeks, I have decided to post something a bit more floral in the keeping with the coming season.

I am also doing a monthly craft fair at the weekend and so decided that I need some little notebooks to put on my stall, and I love using the Heartfelt Creations collections for this sort of project.

To start with I covered some chipboard covers with different paper from the collections (I used Blazing Poppies, Arianna Blooms, Delicate Asters, Delightful Daisies and Sunflower).  The covers were roughly 4" squares so I cut the paper to size before attaching with mod podge, then I coated them with it as a sealer as well...


I covered enough to make 5 different notebooks, but then decided to focus on just one for the photos.
They were left to fully dry overnight, then I used a gilding pen to go around the edges in gold...


The flowers were then started by stamping using brown archival ink...


These were then die cut with the matching die set, and I also stamped and cut a leaf sprig.  I wanted a little bit of extra detail to the notebook so cut a chicken wire style die (mixed media by Tim Holtz) to match with the hexagons that are in the background of the sunflower paper...


I used distress inks and sponge daubers to add colour to all of the pieces (Dried Marigold, Wild Honey, Tea Dye, Peeled Paint and Mowed Lawn).  The flowers were then shaped using a ball tool on a foam mat and the layers put together with glue.  To finish the flower I added a gem.  They were then all stuck to the front of the notebook, I placed them so that most of the words on the paper could still be seen.  Finally I added a spritz of gold spray ink...


Only 4 more to finish now!!!

See you on Friday,

Jane x

Monday, 29 February 2016

Mixed Media Monday - A Trio of Canvases

Hello again, I hope you all had a good weekend!

I was off at a craft show on Saturday with a crafting buddy and one of my daughters who also loves to craft.  We all had a great time, and many crafting goodies were bought.  However this meant that I was really tired yesterday so didn't manage to create anything new for today...but I did get the frames painted for my canvases.

I painted them all with black gesso and then dry brushed Goldfinger paint onto them.  This morning my husband has managed to get them up on the wall...


Not the most brilliant of photos, and we have a very plain wall!!

Only a short one today, but I am already starting making some items that I will post about on Wednesday.

Have a lovely day,

Jane x

Friday, 26 February 2016

Funtastic Friday - Love Canvas

Hello! 

I hope you have had a good week and are looking forward to the weekend.  I am going up to Farnborough in Hampshire tomorrow for the 'Make It' craft show, so am really looking forward to that, and my Monday post might be showing you what I bought!!

On to today and I have now created the third and final canvas for my trio.  Hopefully on Sunday I will get the frames done and they can go up on the wall, I will take a photo if it happens.

I will be entering this project into the following challenges...

* More Mixed Media Challenge - Red
* Mixed Media World Challenge - Love is in the air

I started my last canvas by thinking about the embellishments that I wanted on it.  As it was going to be 'love' I wanted hearts.  The other day I saw Fran Seiford from Stampendous on the HOCHANDA craft channel and she was using embossing powder on shapes with a hot plate.  I loved the effect and thought it could probably be done in the melt pot. 
I die cut a heart 5 times and glued the layers together before putting it on a piece of heat proof mat in the melt pot with a layer of clear ultra thick embossing powder...

 
I was concerned about the glue melting and the layers coming apart, they did slightly and the heart wasn't as flat as it had been to start with but I quite liked the effect.  I had also forgotten that the melt pot slopes slightly so had to prop one end up to level it out.  I ended up taking the mat away so that the heat could get straight to the shape as it wasn't melting evenly, and even though this got the melted powder on the pot it was fine to clean up.  Despite all this it was still good fun and I went on to add aged gold and glittery gold powder and some red chunky glitter.  After inking up a script stamp with black staz on I stamped into the molten powder as soon as it came out of the pot and removed it when it had cooled.  I was so busy trying not to burn myself or anything else that I didn't take any more photos in the pot but here are the embellishments made and cooled...


I then started on the canvas by sticking a sheet of IndigoBlu Grand Tour paper onto the canvas board.  After adding some watered down Goldfinger paint I then gilded the edges with gilding flakes...


I then used the same script stamp from earlier to stamp text onto areas of the canvas using brown staz on.  Texture was added using the 'Art Is' stencil from TCW and a heart stencil from Heidi Swapp using sparkle paste...


Using Word Blocks #1 by IndigoBlu I stamped with versamark and embossed with gold.  After die cutting it out, it was coloured using vintage photo and tea dye distress inks and then some more hearts stencilled onto 2 corners...


Once the main elements were attached I added copper micro beads, some red seed beads and gold gems.  Finally splattering some gold paint to add a finishing touch...


I hope you liked this final canvas, I will now need to find something else to do!!!

Have a good weekend,

Jane x